• Skip to primary navigation
  • Skip to main content
  • Skip to footer
  • Store
  • Support
  • Theme Documentation
  • My Account
  • Cart

9seeds

Building Custom WordPress Solutions | Plugin Development

 
  • Custom Development
  • Themes
  • Plugins
  • About
  • Contact
  • Blog

News

Developing WordPress Locally – Part 1

Posted on November 10, 2013

One question that I get asked a lot is “What is your process for developing sites on WordPress?” I get asked it so often, I figured it was about time that I write it up. Plus, it’s a great question. It’s one I love to ask other developers, too. I don’t think there is such a thing as a perfect setup. I don’t submit this as the best way to develop locally. I submit it solely as how I develop locally. Your milage may vary.

This will end up being a 3 part series of posts. Part 1 will cover starting from scratch. Meaning, creation of a brand new WordPress site. In Part 2 I will cover how to set up a local development site for an existing website. And, in Part 3, I will talk about how I deploy sites live after we’re done.

Tools

I use a number of tools, all of which are Mac based. Some have PC versions and some you will need to go in search of a substitute if you aren’t on a Mac. Some of the tools I use have both free and paid versions. If there is a paid version, that’s the one I’m using. Keep that in mind if you’re not seeing the exact screen or menu items, you may just need to upgrade. These are tools that are going enable you to do the work that makes you money. Pay for them. </soapbox>

That being said, here’s the list of tools I used (in no real order):

  • Desktop Server
    Used for setting up and running WordPress locally. It handles the setup and configuration of PHP, MySQL and Apache.
  • Tower
  • Used for pushing code to our Git repository and to our staging site for client review.
  • Terminal
  • Used for two quick pieces of setup.
  • Finder
    Used to copy a bunch of files.
  • Chrome
    Used for installing WordPress general browsing, of course.
  • PHPMyAdmin
    Used to set up a database for the local site.
  • bitbucket.org
    Our online Git repository. I’ll refer to this as a ‘repo’ or ‘bitbucket’ interchangeably throughout the post.
  • wpengine.com
    Where we host the staging site for clients review. I’ll refer to this as the ‘staging site’ throughout the post.

A quick side note about WPEngine and what I refer to as a staging site. WPEngine offers a simple way of copying your live site to a secondary location called a staging site for the purpose of doing testing. However, my use of the word ‘staging site’ in this post does not specifically mean that I’ve copied the ‘live’ code to a ‘staging’ area. For my specific use, I rarely have the need for both a live and staging version on WPEngine during the development process. So, I rarely use the WPEngine ‘staging’ functionality and instead use what would be considered the ‘live’ environment as a staging environment. So when I say ‘staging’, I simply mean ‘wpengine’ in general. How you decide to use WPEngine and their live/staging environments is entirely up to you.

Before you get started

In order to use Git for pushing your code to your repo and to your staging site, you will need to set up SSH keys and you need to submit your SSH public key to WPEngine. There are excellent tutorials for doing both of those things here and here, so I won’t bother explaining that portion. Just know that I assume you have already created SSH keys and have submitted them to WPEngine before moving forward.

Ready, Set, Go

OK, we’ve got our tools. We’ve got our accounts. We have a client. It’s time to get started.

Hey now, another side note: I’m going to break up the process in to a number of ‘steps.’ Each time there’s a new step, that simply means we are changing applications. In my head, this makes the most sense for breaking up this post in to digestible segments.

Step 1: Desktop Server

I’m about to walk you through what is going to look like the most complicated way to install WordPress ever. But I promise, there is a method to my madness.

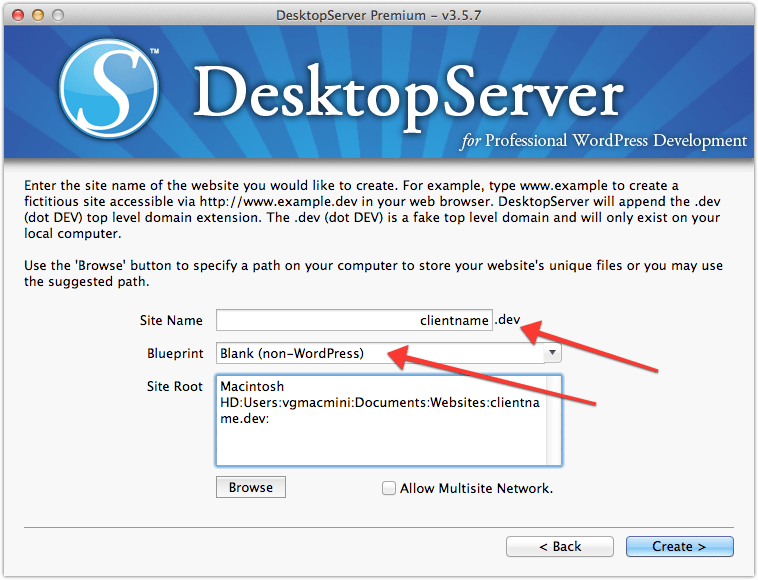
In Desktop Server, start by choosing the ‘create a new development environment’ radio button. On the next screen you will enter a site name (I typically use the client’s name or the actual domain name if we know what it’s going to be), and in the Blueprint dropdown, I choose ‘Blank (non-WordPress)’. We’ll install WordPress manually in a minute. What we’re really doing at this point is setting up the local DNS entries and folders so we can access the site in a browser.

Create SiteBlank Setup

Step 2: Terminal

One thing that Desktop Server does that I wish I could change is that it creates an index.html file inside the new site folder when you create a blank site. It makes sense for them to do it as it closes the loop for users to validate that the setup worked. But for me, it creates an extra step.

To remove the index.html file, I use terminal and run the following two commands:

  • cd /websites/clientname.dev/
  • rm index.html

Your path name will likely be different. I set up a symlink to point /websites/ to my DesktopServer websites folder.

I use Terminal instead of Finder because when you use ‘Move to Trash’, your Mac will add a DS_Store file to the directory. For an upcoming step we need to have the folder be completely empty. If you know of a better way, please leave a comment below.

Step 3: bitbucket.org

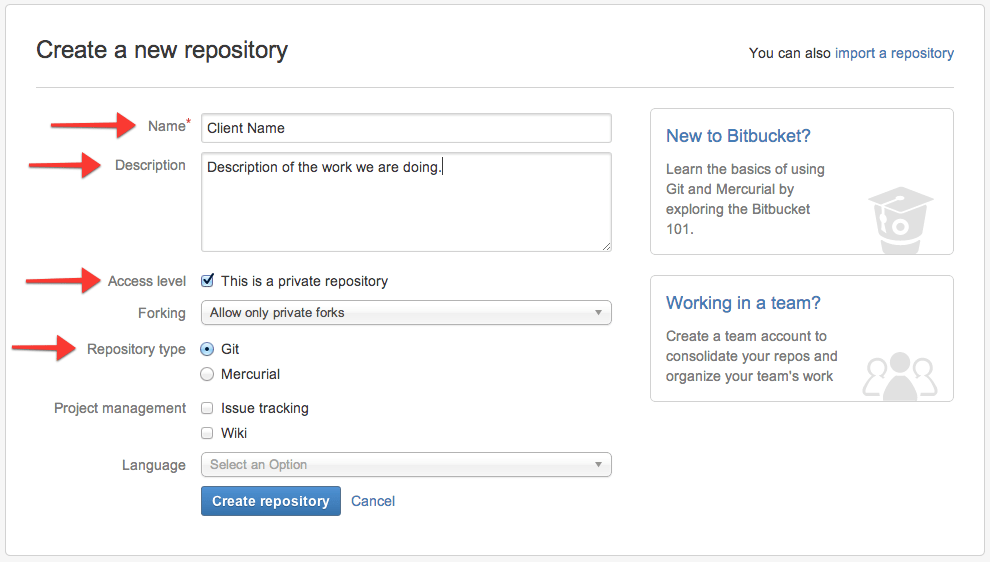
Next I set up a new repository on our bitbucket.org account. Click the ‘Create’ button and on the resulting page all of the presets are fine. I fill in the name for the new repo and (sometimes) I fill in the description and click the ‘Create Repository’ button to continue.
BitBucket New Repo

Once the repo is created I select the Clone button and switch the second dropdown to SSH. In the screenshot below you’ll see that in the highlighted area it says ‘git clone git@bitbucket…’. We don’t actually need the ‘git clone’ portion. We want to copy everything after that. In this example, that’s going to look like this: [email protected]:9seeds/client-name.git Once we have that copied to the clipboard, we’re done with bitbucket for now.
Bitbucket Clone

Step 4: Tower

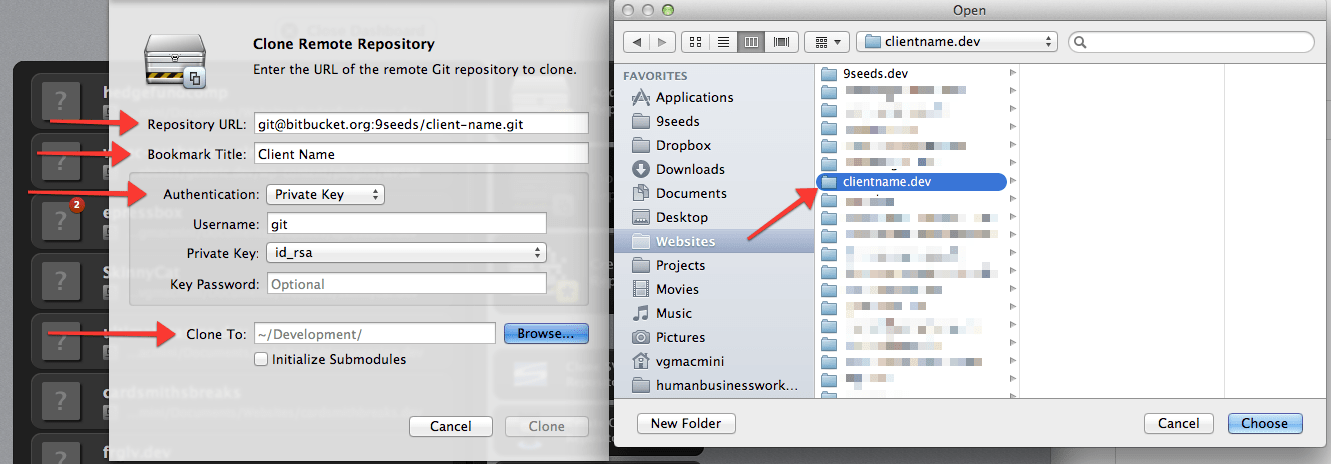
From the Tower dashboard click the ‘Clone Remote Repository’ button. Paste our clipboard in to the top box titled ‘Repository URL’. The Bookmark Title is for your use only. You can change this to be something human readable. In the Authentication dropdown select ‘Private Key.’ and in the ‘Clone To:’ box, click the Browse button and select the /websites/clientname.dev/ folder.
Tower Clone Remote

If you try to clone the repository in to a folder that is not empty, Tower will not let you move forward. This is where Step 2 came in to play.

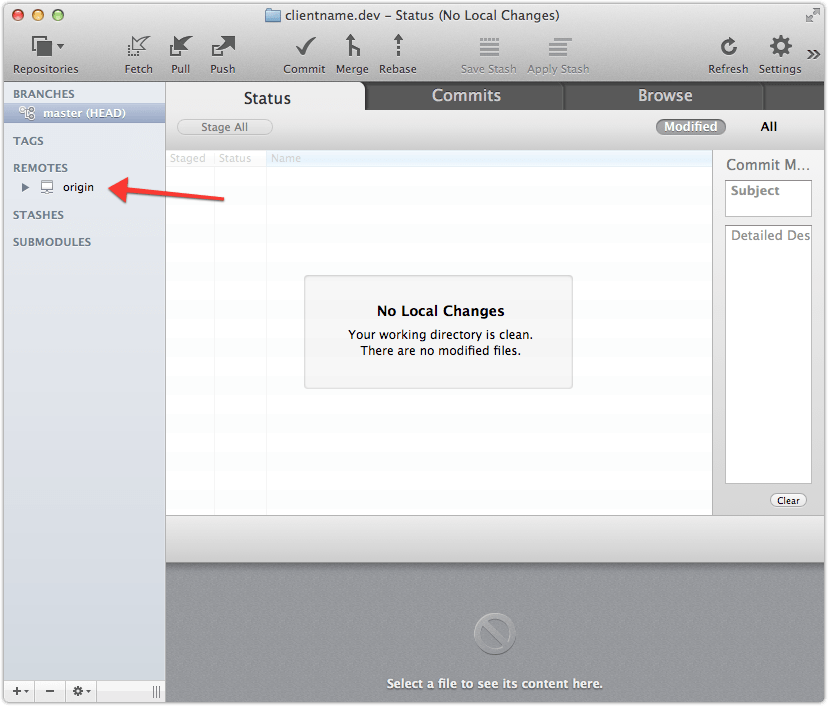
If you double-click the new Client Name repo in Tower, you should see a blank repo that shows one item under the ‘Remote’ section called origin. This is our BitBucket repo. It will look like this:
Tower Blank Repo

Step 5: WPEngine

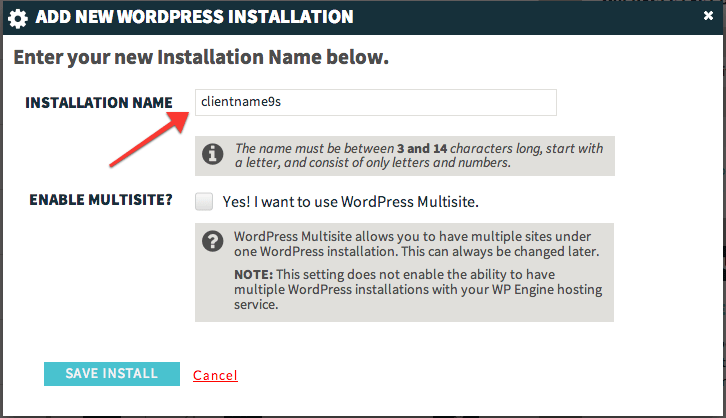
Now we’re going to set up our staging area for our clients to view the work we do. I log in to my account at my.wpengine.com and click the ‘Add Install’ button. In the pop-up window, fill in the Installation Name field and click ‘save install’.

IMPORTANT NOTE: the install names have to be unique across all of WPEngine. Because of that we add ‘9s’ to the end of all our install names. We do this for 2 reasons; 1) we know it’s going to be unique, 2) If you use your client’s name/domain/abbreviation, and later your client tries to use it, they won’t be able to. That seems rather rude. Make yours unique.
WPEngine New Install

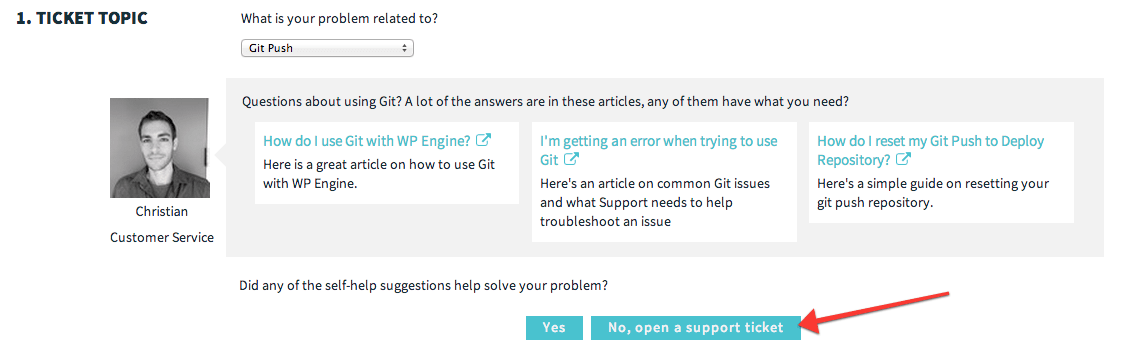
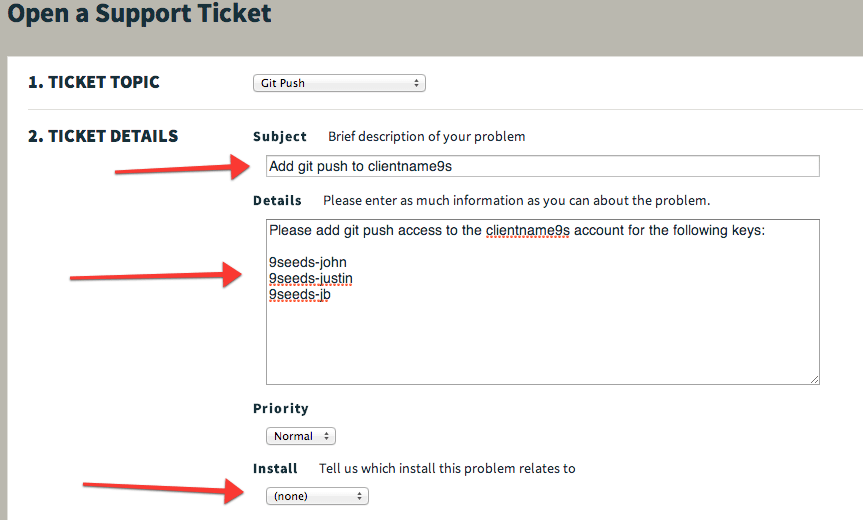
Next, we need to request Git Push access for our new install. Hover over the Support link and click the ‘Open a Ticket’ link. You will then need to click the ‘No, open a support ticket’ link. Next, you will need to authenticate with Zendesk (follow the onscreen instructions. This has changed a couple times so I don’t want to post something that may be immediately outdated) and you’ll end up getting to the Open a Support Ticket page. You will need to fill out the Subject, Details and select which Install you want the access for. See the screenshot for an example of what to write.
WPE Open a Ticket part 1WPEngine - Submit a ticket

Once you submit the request to WPEngine, it will take some time before you receive an email back from them. I’ve had it take 3 minutes, 24 hours and all points in between. We don’t typically need this immediately, so we are safe to move on to the rest of the setup while we wait.

Step 6: Chrome

We are almost ready to install WordPress. But before we do, I like to add the .gitignore file to our empty folder. This file tells Git which files you want it to skip when pushing data to your repository. For me, I like to ignore all the WordPress core files and things like the /uploads/ folder. Mainly I want to keep everything in the /wp-content/themes/ folder and /wp-content/plugins/ as these are the two locations where I’m generally going to do all of my work.

If you read the page where WPEngine talks about Git, you may have seen the section talking about .gitignore. They have two starter files that you can use. One which keeps the WP files in your repo and another that ignores the core files. It’s that second one that I’m going to use. You can find it here.

Browse to that page and choose ‘Save page as’ from the menu. In the save dialog box, rename the file to .gitignore and select the clientname.dev folder and click save. You will get a warning about file names starting with a dot not being visible. That’s fine, click OK and continue.

Note: Be sure it doesn’t add .txt to the end of your file name. It needs to be named .gitignore and not .gitignore.txt
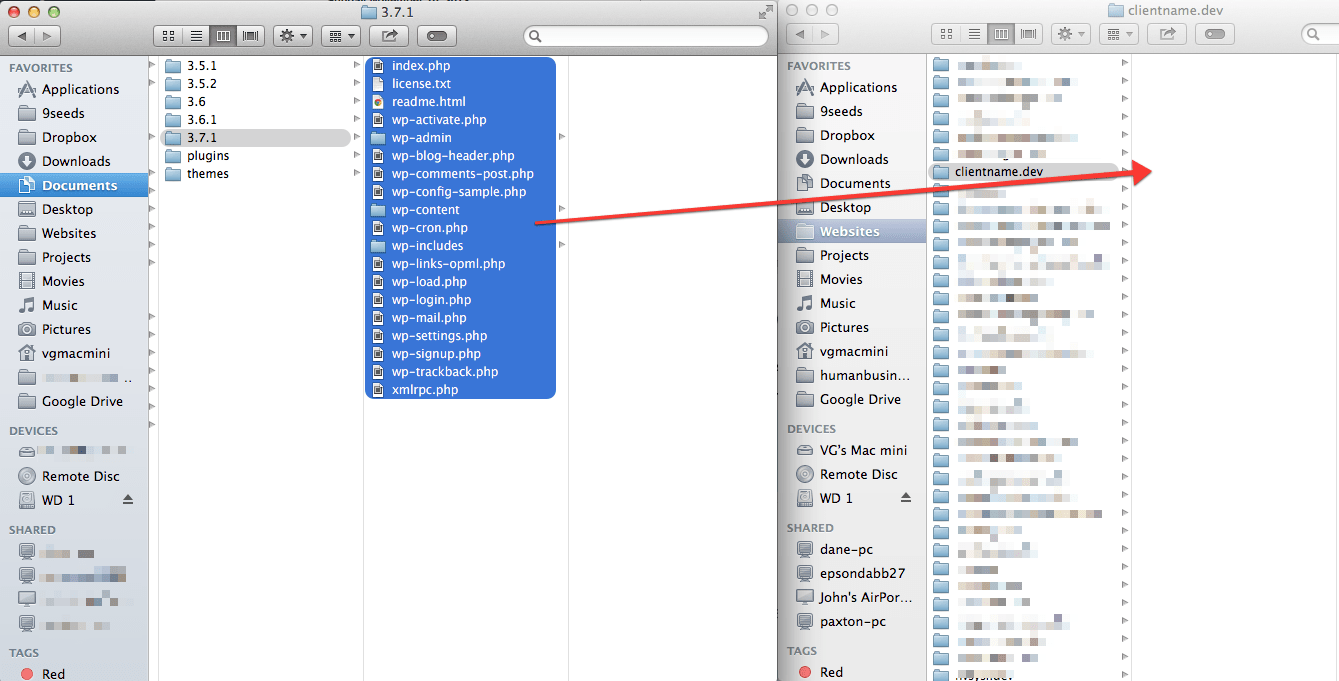
Make Gitignore

Step 7: Finder

We’re finally going to start the WP install. I have already downloaded the latest version of WordPress (3.7.1 as of this writing). In Finder I copy all the files and paste them in to the /websites/clientname.dev/ folder.
Move WordPress files

Step 8: PHPMyAdmin

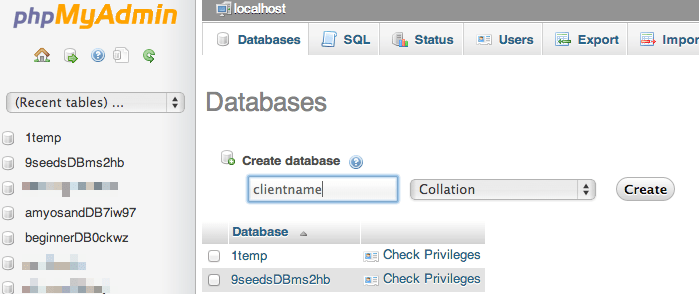
To set up a database for our new site, I use PHPMyAdmin. When you installed DesktopServer, they also set up PHPMyAdmin for you. You access it in a browser by going to http://127.0.0.1/phpmyadmin/

First I click the ‘Databases’ button at the top. On the resulting page I create a database using a name that will be easy to remember. In this case I’ll use ‘clientname’.
Make Database 1Make Database 2

Step 9: Chrome

Now it’s time to install WordPress proper. In a browser window visit the URL for your new site; http://clientname.dev/. If you have never installed WordPress manually, it’s very simple. If you have, you already know that. Here’s the basic steps:
Screen 1: Click ‘Create a Configuration File’ button.
Screen 2: Click ‘Let’s Go!’
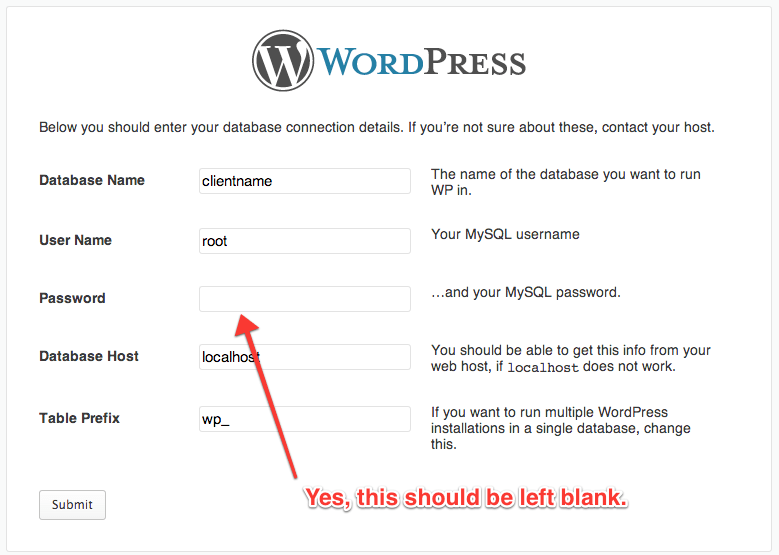
Screen 3: Fill in the Database Name, User Name and Password fields. It should look like the screenshot below.
Screen 4: Click ‘Run the install’
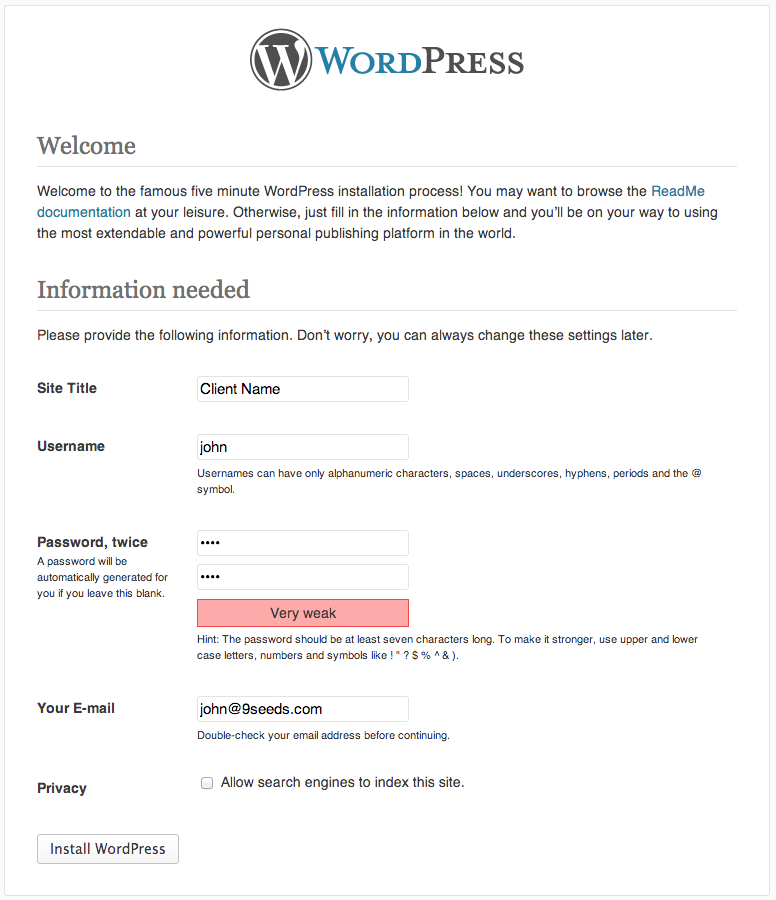
Screen 5: Fill in the Site Title, Username, Password, Email fields. I uncheck the ‘Privacy’ checkbox, but I don’t think it matters much either way.
Screen 6: Technically you’re done. Log in if you’d like.
WP InstallWP Install

Step 10: Tower

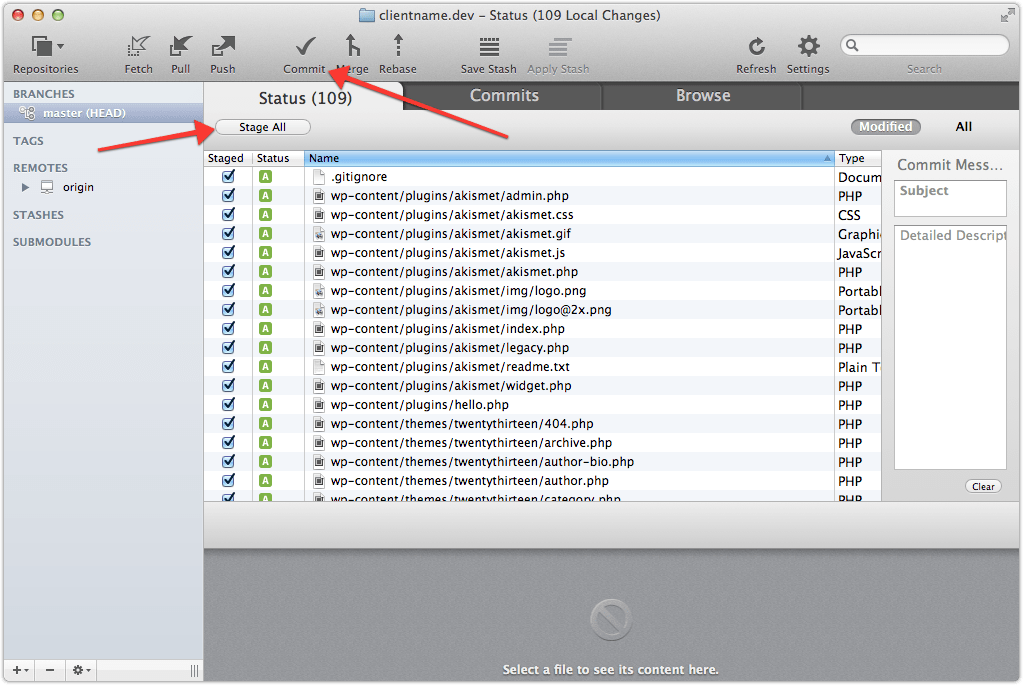
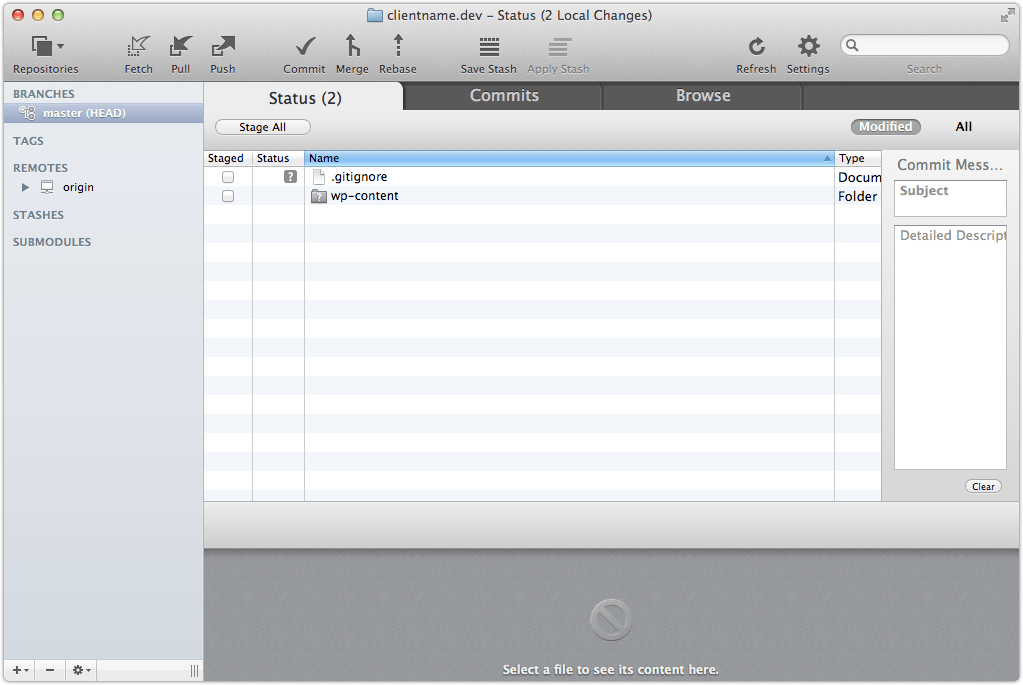
If you open up Tower again, it’s going to look like this:
Tower Pre Commit

You can see our .gitignore file and the wp-content folder. Perfect. We’re going to commit this as our initial release. We do that by first clicking the ‘Stage All’ button and then clicking the ‘Commit’ button at the top. In the pop-up window we’ll provide a descriptive submit message before we continue.
Tower Staged filesTower Pre Commit

Then, the next step is something we will only do one time ever. We’re going to drag our ‘Master’ branch on to our ‘origin’ in the remotes section. Here’s a video example of what I mean.

What this is doing is making it so that our Bitbucket repo is the place where files will go when we click the ‘Push’ button in the future. I feel like this needs more explanation, but that could turn in to a whole other blog post. Let me just say that:

Commit = store stuff in your local repository (as in, on your computer, not on bitbucket/wpengine)
Push = send the files somewhere else. (we want our files to go to bitbucket for now. We’ll deal with wpengine shortly)

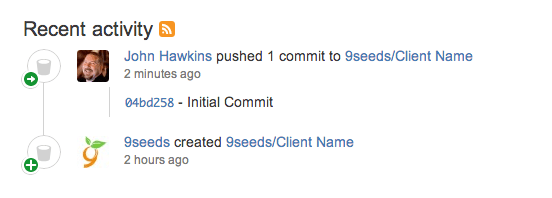
If you were to go to Bitbucket now and look at the repo you created, you should now see something similar to this:
Bitbucket Updated

Step 11: Terminal

I’m going to assume that enough time has passed that you’ve received the confirmation from WPEngine about your Git access. So the next step is to add WPEngine as a new remote location for our code. To do this I use the 4 commands below inside a Terminal window:

cd /websites/clientname.dev/
git remote add WPE-Production [email protected]:production/clientname9s.git
git config remote.WPE-Production.gtSSHKey ~/.ssh/id_rsa
git config remote.WPE-Production.gtAlwaysFetchAllTags true

Keep in mind that you will need to modify the first 3 lines to point to your proper directory name on line 1, your wpengine install name on line 2 and your SSH Key ID on line 3 (if you used something other than id_rsa)

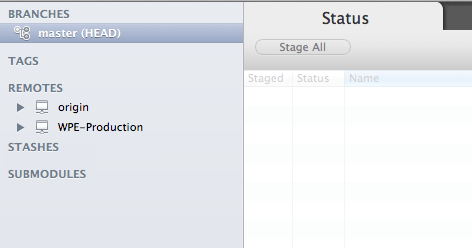
If you open Tower again, instead of seeing one remote, you should now see two. Like this:
Tower with 2 origins

Step 12: Sublime Text 2

Hey, it’s time to go and write some code. I’m going to assume you already know how to do that part. For my example, I’m going to go create a new theme for my client. I’ll do that by creating a folder at /websites/clientname.dev/wp-content/themes/client-theme/

Step 13: Tower

Now that we created our theme, we’re going to do two things. First we’re going to push our theme to Bitbucket for safe keeping. Then we’re going to push our changes to WPEngine to show the client. To do this, first we need to stage and commit our files just like we did in Step 10. But this time, instead of dragging ‘master’ on to ‘origin’, we only need to click the ‘Push’ button up top and select our destination.
Tower PushPush to Master

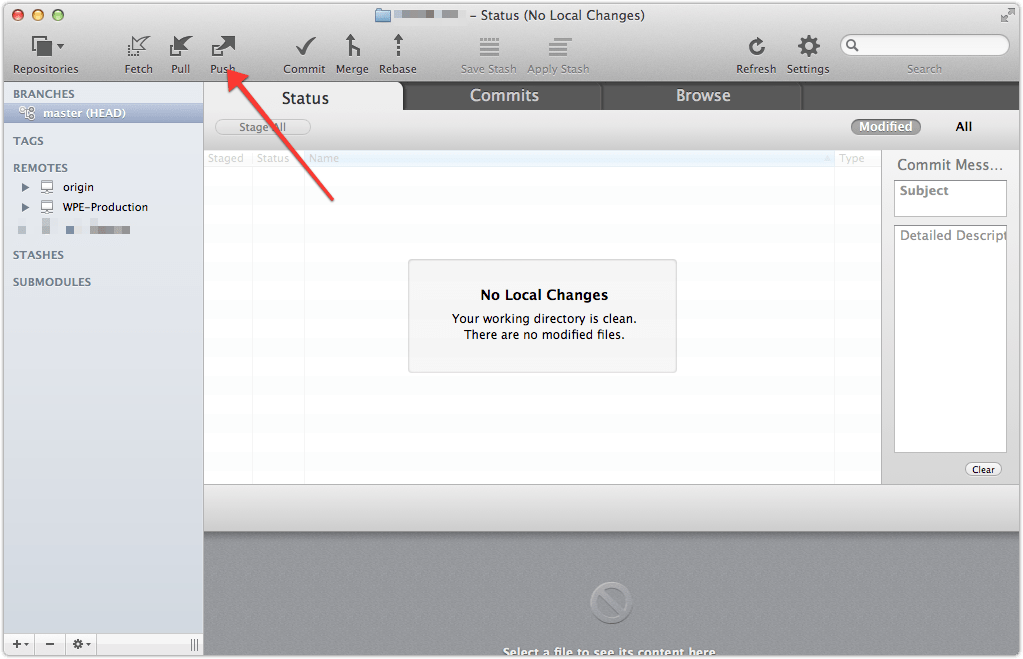
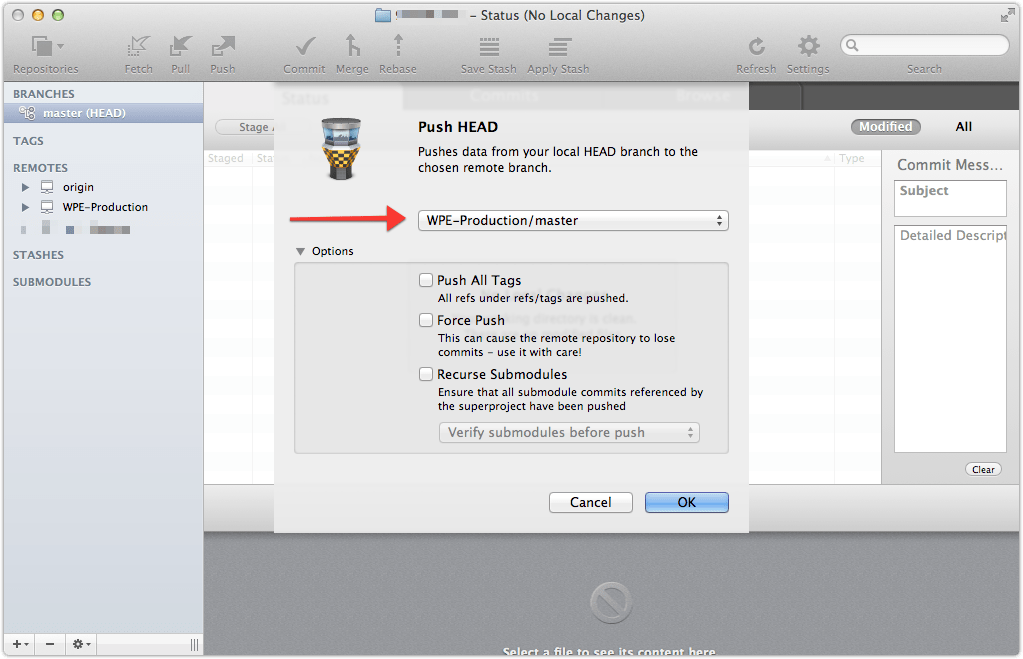
Now click ‘Push’ again, but this time choose ‘WPE-Production/master’ from the dropdown:
tower-push-to-wpe

That’s it. You are all set up to work on your site. You can now loop through steps 12 and 13 as many times as you need until the project is finished.

If you have any questions about the process, or if you write up your own process and want to share, please leave a comment below.

Want More?

– Read Part 2 of this series
– Read Part 3 of this series
– Sign up for our newsletter

Continue Reading

john

    More by john

    Event Ticketing for WordPress version 2.0

    Posted on November 7, 2013

    Three years ago, almost to the day, we released the first version of WP Event Ticketing, which is a WordPress plugin that makes it simple to sell event tickets directly from your WordPress website. Because of WP Event Ticketing, people no longer need to use 3rd-party services that charge organizers or attendees $1 a ticket (or more) on top of PayPal processing fees, just to sell tickets. I loved that our plugin would save people money, and give them the power to control their own data.

    I can remember with amazing detail how excited (and nervous) I was the day we released the plugin. Since that original launch, the plugin has been downloaded more than 23 thousand times. People have used the plugin to sell hundreds of thousands of event tickets of all shapes and sizes, all without that pesky per-ticket processing fee.

    I take great pride in knowing that we’ve saved our users more than a million dollars in fees.

    Our plans for the event ticketing plugin have always been big. There are plenty of other ticket plugins out there, but we feel that our long term direction for the plugin is unique. But early last year we realized, in order to reach those goals, the plugin was going to need to be rewritten. I don’t mean a little bit of a rewrite. I’m talking about starting over from a blank slate.

    Let the rewrite begin

    If you think it’s a lot of work to build a plugin of this size, you should try doing it twice. Oi. We started the process 3 times last year. Maybe more. I’m trying to block out that memory. But finally, in January of this year, Justin, Ben and I locked ourselves in a room and over the course of 3 days wrote the first couple thousand lines of code that would eventually become version 2.0.

    Yes, you read that right. We started the rewrite back in January. Here we are, 9 months later, and I would like to introduce you to a brand new plugin…

    Event Ticketing for WordPress

    There’s that excitement again.

    What’s new in version 2

    The first thing you might notice is, this is not an upgrade to the previous plugin. This is, in fact, a completely separate plugin. We thought long and hard about this, and in the end we felt that it would be too easy for something to go wrong with a data conversion from the old to the new format. We didn’t want to run the risk of causing any problems for existing users who have events already on sale. We will encourage the users of the old plugin to move to the new version as soon as their current events are completed. Eventually, we will shut down one of the versions.

    Next up, custom post types. The original plugin stored all its data in serialized arrays. Which wasn’t really a problem… unless your event had 500 or 1000 attendees. That many attendees could potentially bring your server to a grinding halt. Oops! Well, not anymore. Now everything is stored in custom post types, which is way more efficient and scalable. Not to mention with the new data storage model, it opens us up to some exciting features down the line.

    One of the most frequent requests we received was for internationalization. I’m thrilled to say that version 2.0 is completely i18n compatible. We’ve already translated the plugin in to 10 languages. If you would like to get involved and translate it in to another language, please let us know.

    Just the beginning

    As I said, this release is mainly a rewrite of the previous plugin. So the feature set is largely the same as before. However, the new codebase will make it much easier moving forward to add features.

    Download Event Ticketing for WordPress. Then, let us know what you think. We would absolutely appreciate the feedback. Any bugs you find, please report them to support.9seeds.com so we can get them fixed right away. If you’ve got feature requests, we’d like to hear about those too.

    Continue Reading

    john

      More by john

      Plugin update, WP Time Tracker 1.2

      Posted on October 21, 2013

      This summer we released version 1.0 of the WP Time Tracker plugin. We know it was the minimum viable product, but wanted to get it out the door so we could start to get some feedback. Since that release we’ve been fielding some requests for additional functionality in the plugin. We’re happy to announce the release of WP Time Tracker version 1.2.

      The Highlights

      • Clients are now stored as a custom post type allowing you to store contact information for each client.
      • Hours are now tracked against projects which are assigned to clients. This opens up the plugin to additional breakdown reports which will be coming soon.
      • New, quicker data entry form for adding hours.
      • The ‘My Hours’ page shows each staff member all the hours they’ve previously entered.
      • Staff members can use the in-line editor on the ‘My Hours’ page to update any record that hasn’t already been marked as invoiced.
      • Staff members no longer need to be authors/editors on the site. Instead, you can mark any user on the site as an active contractor via the user edit screen.

      We’ve already been using the new version for a few weeks, and I have to tell you, I absolutely love how much quicker it is to enter hours each day.

      Screenshots

      What’s On Tap?

      We’re just getting started with Time Tracker. We’ve got a number of additional features that we’ll be adding in the coming weeks and months, including new set of reports.

      Don’t Wait, Buy Now!

      Buy the plugin today and you’ll receive a full year of automatic updates and support!
      [purchase_link id=”1290″ text=”Purchase” style=”button” color=”blue”]

      Upgrading from version 1.0

      This upgrade is pretty sizable and changes how some features work. For example, your staff members no longer need access to the WordPress dashboard. Instead, you will create two pages that can be accessed on the front end, but are only viewable to logged in users.

      Here’s how the upgrade process will work:

      • After you upgrade, the plugin will convert your existing clients to custom post type entries
      • Next, it will create a default project for each client
      • All existing hours entries will be associated to the proper client’s default project
      • Edit each of your staff’s user profiles and mark them as “active contractors” by checking the box at the bottom of the profile
      • Create two pages; Hours and My Hours
        • Hours is where your staff will enter their hours
        • My Hours is where your staff can view and edit existing hours entries
      • Edit each of your projects and select which of your staff members has access. Note, admin level users have access to all projects.

      Give your staff the direct links to both pages and you’re all set!

      Continue Reading

      john

        More by john

        How to disable WordPress user accounts

        Posted on August 26, 2013

        Right out of the box WordPress makes it very simple for you to run a site with any number of authors. Each author gets their own user account with a specific set of permissions. Some may only be able to write posts and submit them for review. Others may be able to write and post at will. And still another set may have the ability to write, post and also act as an editor for other authors’ posts. This is such a basic function of WordPress, you may simply take it for granted. I can tell you that I don’t give it much thought when I add a new user, set their permission level and move on with my day. But what happens when situations change?

        Recently one of our clients emailed and said that one of their employees had quit and they wanted to delete their user account to make sure nothing malicious took place. But since the employee had written dozens of blog posts over the past few years, they didn’t want to lose that content.

        The problem with deleting a user is that when you do you are forced to make a decision; delete all the pages and posts attributed by that user, or, assign all pages and posts from that user to a different user. I don’t know about you, but neither of those options are appealing to me.

        After thanking the client for not knee-jerk reacting and simply deleting the user account, we talked about the possible solutions, both good and bad. Here are the different options we spoke about, along with a description of how each option works.

        Change the user’s role to Subscriber

        While this will certainly keep the user from being able to write any new posts or edit any previous posts, what it doesn’t stop them from doing is modifying their display name. If your theme displays the name of the author on each post, a user with bad intentions could change their display name to something not-so-flattering and it display on every post they’ve written.

        Suggestion: Do not use this method

        Change the email address/password

        When you change a user’s password, they can simply use the lost password feature to have a password reset link sent to their email. If you change their email address as well, they would never receive that password link. This is definitely effective and would keep the user out. Unless they guess the password.

        Suggestion:  Effective, but I’d use this with some level of caution.

        Change the user’s role to No Role For This Site

        If you set a user’s role to ‘No Role For This Site’, the next time they log in they will see the following message:

        no-permission

        This is extremely effective. The user can technically still log in, but they have no ability to access any pages in the admin area.

        Suggestion: If you want a non-plugin solution, this works great. My only concern is that the user is technically still logged in. It does leave a window open for a use with malicious intent (albeit a very small window)

        Disable Users Plugin

        Once activated, the Disable Users plugin adds a checkbox to each user’s profile page where an admin can check a box to disable the user’s account. Like this:

        disable-user-account

        With that checkbox set, when that user tries to log in, they are immediately logged back out and shown the following message:

        account-disabled

        Suggestion: I like that the user can’t access their profile, can’t access their posts and can’t even log in. I say, we have a winner!

        Continue Reading

        john

          More by john

          Plugin translations using GlotPress

          Posted on July 5, 2013

          One of the requests we get on a regular basis is for our plugins to be translated in to other languages. For new plugins we create, that’s pretty simple. As we build the plugins, we wrap all the text strings with the proper bits of code. But, for a couple of the plugins that were already built, going back through and finding all the text stings is a big, big task. But, it had to be done!

          We went back through the WP Affiliate Plugin and located nearly 375 text strings. The newly released WP Time Tracker had but 48. And, the upcoming release of WP Event Ticketing 2.0 has a slew of them as well. They’re all set and ready to be translated. The next obvious question was, how are we going to handle that?

          GlotPress

          The other day I landed on http://translate.joedolson.com/ and found that he was using GlotPress to handle the translations of his plugins. Bingo! I knew the solution I wanted to use. But how, exactly, do we go about it? I found this great post by Remkus de Vries and followed along. A short time later, http://translate.9seeds.com/ was ready to go.

          A quick side-note before I move on with the post, if you are interested in a free one-year license for any of our plugins AND you can adequately translate in to another language, head over to http://translate.9seeds.com/ and be the first to submit a complete language file for one of the plugins listed.

          Preparing to Translate

          After I got GlotPress and WordPress installed and was able to get our first couple projects entered and ready to go, I was realizing that I didn’t much care for the lack of consistency between how GlotPress and WordPress looked. So I thought I’d provide a step-by-step of how I went about setting things up.

          Note: For my setup I created a subdomain that had nothing else on it and then created a blank database. I’ll assume you’re doing the same.

          Download GlotPress
          There isn’t a zip file download for GlotPress (that I know of), so to get a copy of GlotPress you’ll need to use SVN. You can do this by opening Terminal and using the following command:

          svn export http://svn.glotpress.org/trunk/ glotpress

          This will pull the latest copy of GlotPress from the server, but won’t include all the .svn folders mixed in.

          Make a gp-config.php file
          Make a copy of gp-config-example.php and rename it gp-config.php. Add your database information and unique phrases and leave the $gp_table_prefix set to ‘gp_’. You should also uncomment the following two lines:

          // define('CUSTOM_USER_TABLE', 'wp_users');
          // define('CUSTOM_USER_META_TABLE', 'wp_usermeta');
          

          Upload GlotPress and install
          Upload all the GlotPress files/folders to your domain’s root directory, then, open up a browser and navigate to your your GlotPress install. This will cause the installer to run and you’ll end up seeing a notice that your username has been set to ‘admin’ and your password is set to ‘a’. You can log in and reset that at this point.

          Install WordPress
          In the root folder, create a new subdirectory called wp (technically, you can name it whatever you want). Upload the latest version of WordPress and run through the install as you normally would. Make sure that you leave the database prefix set to ‘wp_’.

          At this point, you can now go back to your GlotPress install and log in using the admin username/password you created during your WordPress setup.

          Technically speaking, you could stop right here. You have a functioning setup with 1 admin user. The problem is, your users don’t have a way of getting to the registration page, or back to GlotPress if they do make it to the registration page. So this next section will detail the customizations I made.

          Customizing GlotPress

          Let People Register
          Anybody who lands on your GlotPress install would have no idea where to go to register since the only link in the top right corner says “Log in”. To fix that, I modified /gp-templates/header.php and added two links; Register and Lost Password. The register link points to the root of the WordPress install (I’ll explain further in a minute as to why) and the lost password link points to the standard WordPress last password page.

          While I was editing the header, I also removed the GlotPress logo and replaced it with the 9seeds logo.

          Custom Theme for WordPress
          I really wasn’t looking to make a big production out of this project. So, I decided to create a custom child theme based on Genesis. For the stylesheet, I copied the style.css that was included in GlotPress and used that as the starting point. I then created two quick functions to modify the header and footer to also match the look of GlotPress. I created both an index.php and page.php that have the same layout in order to keep the experience consistant. I’ll confess that I took the simple route and hard-coded the links for Register – Lost Password – Log in as to keep the look matching for non-logged in users.

          Gravity Forms + User Registration add-on
          I made a quick form using Gravity Forms and added it to a page. I then forced that page to be the home page on the site as it’s really the only thing I want users doing on the WordPress side of things. I used the User Registration add-on to auto-create subscriber level users so even if they do log in to WordPress, they can’t really do much.

          Clean Up the Email
          Since I don’t want new users being redirected back to the WordPress install, I created a quick add-on plugin that will filter the new user welcome email. I point the users back to the GlotPress install rather than to WordPress. This was also a great place to include information about where to get support if needed.

          if ( !function_exists('wp_new_user_notification') ) {
          	function wp_new_user_notification( $user_id, $plaintext_pass = '' ) {
          
          		$message  = __('Hi there,') . "\r\n\r\n";
          		$message .= __("Welcome to 9seeds Translations! Here's how to log in:") . "\r\n\r\n";
          		$message .= 'http://translate.9seeds.com/login' . "\r\n";
          		$message .= sprintf(__('Username: %s'), $user_login) . "\r\n";
          		$message .= sprintf(__('Password: %s'), $plaintext_pass) . "\r\n\r\n";
          		$message .= __('If you have any problems, please contact support at http://support.9seeds.com/.') . "\r\n\r\n";
          		$message .= __('Cheers!');
          
          		wp_mail($user_email, __('Your 9seeds translations login info'), $message);
          
          	}
          }
          

          Redirect Users
          Since I didn’t really want users logging in to the WordPress dashboard, why not redirect them if they try? In my handy little plugin, I added the following chunk of code to send non-admins back to GlotPress:

          function glot_admin_redirect() {
          	if ( ! current_user_can( 'manage_options') ) {
          		wp_redirect( 'http://translate.9seeds.com/' );
          		exit;
          	}
          }
           
          add_action('admin_init', 'glot_admin_redirect');
          

          The only thing I haven’t done at this point that I’ll probably end up doing later is to redirect the lost password form to a front-end page as well. Not to hide the fact that it’s WordPress, but more to keep the user experience smooth and have all the pages have the same look and feel.

          So there you have it. That’s our setup for GlotPress. Is there any other customizations you’ve done on your own that you’d like to share? I’d love to hear about them in the comments below.

          Continue Reading

          john

            More by john
            • Prev
            • Page 1
            • Interim pages omitted …
            • Page 8
            • Page 9
            • Page 10
            • Page 11
            • Page 12
            • Interim pages omitted …
            • Page 20
            • Next

            Footer

            Get in Touch

            • New Project Inquiry
            • Product Support and General Inquiry
            • Store Purchase Terms and Conditions
            • Store FAQ
            • Cookie Policy
            • Privacy Policy

            Our Services

            • Custom WP Development
            • Theme Store
            • Plugin Store

            WordPress Plugins for Sale

            • Time Tracker
            • Authorize.net SIM Gateway

            WordPress Plugins for Free

            • Simple Calendar
            • WP Chargify
            • Facebook
            • Twitter
            • LinkedIn
            • WordPress
            • GitHub

            Copyright 2025 | 9seeds, LLC

            Like nearly all websites this one uses cookies too. Like most users we think consent banners like these are a dumb solution, but it's what we've got until new laws are passed. We use cookies on our website for remembering your preferences, for example if you're logged in or what is in your cart. We also use 3rd party cookies for analytics so we know what pages on the site are most popular. By clicking “Accept”, you consent to the use of ALL the cookies.
            Do not sell my personal information.
            Cookie SettingsAccept
            Manage consent

            Privacy Overview

            This website uses cookies to improve your experience while you navigate through the website. Out of these, the cookies that are categorized as necessary are stored on your browser as they are essential for the working of basic functionalities of the website. We also use third-party cookies that help us analyze and understand how you use this website. These cookies will be stored in your browser only with your consent. You also have the option to opt-out of these cookies. But opting out of some of these cookies may affect your browsing experience and may even preclude you being able to login to the website.
            Necessary
            Always Enabled
            Necessary cookies are absolutely essential for the website to function properly. These cookies ensure basic functionalities and security features of the website, anonymously.
            CookieDurationDescription
            __stripe_mid1 yearThis cookie is set by Stripe payment gateway. This cookie is used to enable payment on the website without storing any patment information on a server.
            __stripe_sid30 minutesThis cookie is set by Stripe payment gateway. This cookie is used to enable payment on the website without storing any patment information on a server.
            cookielawinfo-checkbox-advertisement1 yearSet by the GDPR Cookie Consent plugin, this cookie is used to record the user consent for the cookies in the "Advertisement" category .
            cookielawinfo-checkbox-analytics1 yearSet by the GDPR Cookie Consent plugin, this cookie is used to record the user consent for the cookies in the "Analytics" category .
            cookielawinfo-checkbox-necessary1 yearSet by the GDPR Cookie Consent plugin, this cookie is used to record the user consent for the cookies in the "Necessary" category .
            cookielawinfo-checkbox-others1 yearSet by the GDPR Cookie Consent plugin, this cookie is used to store the user consent for cookies in the category "Others".
            cookielawinfo-checkbox-performance1 yearSet by the GDPR Cookie Consent plugin, this cookie is used to store the user consent for cookies in the category "Performance".
            Functional
            Functional cookies help to perform certain functionalities like sharing the content of the website on social media platforms, collect feedbacks, and other third-party features.
            Performance
            Performance cookies are used to understand and analyze the key performance indexes of the website which helps in delivering a better user experience for the visitors.
            Analytics
            Analytical cookies are used to understand how visitors interact with the website. These cookies help provide information on metrics the number of visitors, bounce rate, traffic source, etc.
            CookieDurationDescription
            _ga2 yearsThe _ga cookie, installed by Google Analytics, calculates visitor, session and campaign data and also keeps track of site usage for the site's analytics report. The cookie stores information anonymously and assigns a randomly generated number to recognize unique visitors.
            _gid1 dayInstalled by Google Analytics, _gid cookie stores information on how visitors use a website, while also creating an analytics report of the website's performance. Some of the data that are collected include the number of visitors, their source, and the pages they visit anonymously.
            CONSENT2 yearsYouTube sets this cookie via embedded youtube-videos and registers anonymous statistical data.
            Advertisement
            Advertisement cookies are used to provide visitors with relevant ads and marketing campaigns. These cookies track visitors across websites and collect information to provide customized ads.
            CookieDurationDescription
            VISITOR_INFO1_LIVE5 months 27 daysA cookie set by YouTube to measure bandwidth that determines whether the user gets the new or old player interface.
            YSCsessionYSC cookie is set by Youtube and is used to track the views of embedded videos on Youtube pages.
            yt-remote-connected-devicesneverYouTube sets this cookie to store the video preferences of the user using embedded YouTube video.
            yt-remote-device-idneverYouTube sets this cookie to store the video preferences of the user using embedded YouTube video.
            Others
            Other uncategorized cookies are those that are being analyzed and have not been classified into a category as yet.
            CookieDurationDescription
            cookielawinfo-checkbox-functional1 yearThe cookie is set by GDPR cookie consent to record the user consent for the cookies in the category "Functional".
            SAVE & ACCEPT
            Powered by CookieYes Logo