• Skip to primary navigation
  • Skip to main content
  • Skip to footer
  • Store
  • Support
  • Theme Documentation
  • My Account
  • Cart

9seeds

Building Custom WordPress Solutions | Plugin Development

 
  • Custom Development
  • Themes
  • Plugins
  • About
  • Contact
  • Blog

Tech Talk

How to disable WordPress user accounts

Posted on August 26, 2013

Right out of the box WordPress makes it very simple for you to run a site with any number of authors. Each author gets their own user account with a specific set of permissions. Some may only be able to write posts and submit them for review. Others may be able to write and post at will. And still another set may have the ability to write, post and also act as an editor for other authors’ posts. This is such a basic function of WordPress, you may simply take it for granted. I can tell you that I don’t give it much thought when I add a new user, set their permission level and move on with my day. But what happens when situations change?

Recently one of our clients emailed and said that one of their employees had quit and they wanted to delete their user account to make sure nothing malicious took place. But since the employee had written dozens of blog posts over the past few years, they didn’t want to lose that content.

The problem with deleting a user is that when you do you are forced to make a decision; delete all the pages and posts attributed by that user, or, assign all pages and posts from that user to a different user. I don’t know about you, but neither of those options are appealing to me.

After thanking the client for not knee-jerk reacting and simply deleting the user account, we talked about the possible solutions, both good and bad. Here are the different options we spoke about, along with a description of how each option works.

Change the user’s role to Subscriber

While this will certainly keep the user from being able to write any new posts or edit any previous posts, what it doesn’t stop them from doing is modifying their display name. If your theme displays the name of the author on each post, a user with bad intentions could change their display name to something not-so-flattering and it display on every post they’ve written.

Suggestion: Do not use this method

Change the email address/password

When you change a user’s password, they can simply use the lost password feature to have a password reset link sent to their email. If you change their email address as well, they would never receive that password link. This is definitely effective and would keep the user out. Unless they guess the password.

Suggestion:  Effective, but I’d use this with some level of caution.

Change the user’s role to No Role For This Site

If you set a user’s role to ‘No Role For This Site’, the next time they log in they will see the following message:

no-permission

This is extremely effective. The user can technically still log in, but they have no ability to access any pages in the admin area.

Suggestion: If you want a non-plugin solution, this works great. My only concern is that the user is technically still logged in. It does leave a window open for a use with malicious intent (albeit a very small window)

Disable Users Plugin

Once activated, the Disable Users plugin adds a checkbox to each user’s profile page where an admin can check a box to disable the user’s account. Like this:

disable-user-account

With that checkbox set, when that user tries to log in, they are immediately logged back out and shown the following message:

account-disabled

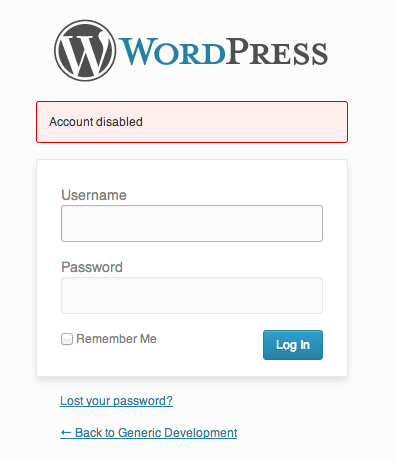
Suggestion: I like that the user can’t access their profile, can’t access their posts and can’t even log in. I say, we have a winner!

Continue Reading

john

    More by john

    Plugin translations using GlotPress

    Posted on July 5, 2013

    One of the requests we get on a regular basis is for our plugins to be translated in to other languages. For new plugins we create, that’s pretty simple. As we build the plugins, we wrap all the text strings with the proper bits of code. But, for a couple of the plugins that were already built, going back through and finding all the text stings is a big, big task. But, it had to be done!

    We went back through the WP Affiliate Plugin and located nearly 375 text strings. The newly released WP Time Tracker had but 48. And, the upcoming release of WP Event Ticketing 2.0 has a slew of them as well. They’re all set and ready to be translated. The next obvious question was, how are we going to handle that?

    GlotPress

    The other day I landed on http://translate.joedolson.com/ and found that he was using GlotPress to handle the translations of his plugins. Bingo! I knew the solution I wanted to use. But how, exactly, do we go about it? I found this great post by Remkus de Vries and followed along. A short time later, http://translate.9seeds.com/ was ready to go.

    A quick side-note before I move on with the post, if you are interested in a free one-year license for any of our plugins AND you can adequately translate in to another language, head over to http://translate.9seeds.com/ and be the first to submit a complete language file for one of the plugins listed.

    Preparing to Translate

    After I got GlotPress and WordPress installed and was able to get our first couple projects entered and ready to go, I was realizing that I didn’t much care for the lack of consistency between how GlotPress and WordPress looked. So I thought I’d provide a step-by-step of how I went about setting things up.

    Note: For my setup I created a subdomain that had nothing else on it and then created a blank database. I’ll assume you’re doing the same.

    Download GlotPress
    There isn’t a zip file download for GlotPress (that I know of), so to get a copy of GlotPress you’ll need to use SVN. You can do this by opening Terminal and using the following command:

    svn export http://svn.glotpress.org/trunk/ glotpress

    This will pull the latest copy of GlotPress from the server, but won’t include all the .svn folders mixed in.

    Make a gp-config.php file
    Make a copy of gp-config-example.php and rename it gp-config.php. Add your database information and unique phrases and leave the $gp_table_prefix set to ‘gp_’. You should also uncomment the following two lines:

    // define('CUSTOM_USER_TABLE', 'wp_users');
    // define('CUSTOM_USER_META_TABLE', 'wp_usermeta');
    

    Upload GlotPress and install
    Upload all the GlotPress files/folders to your domain’s root directory, then, open up a browser and navigate to your your GlotPress install. This will cause the installer to run and you’ll end up seeing a notice that your username has been set to ‘admin’ and your password is set to ‘a’. You can log in and reset that at this point.

    Install WordPress
    In the root folder, create a new subdirectory called wp (technically, you can name it whatever you want). Upload the latest version of WordPress and run through the install as you normally would. Make sure that you leave the database prefix set to ‘wp_’.

    At this point, you can now go back to your GlotPress install and log in using the admin username/password you created during your WordPress setup.

    Technically speaking, you could stop right here. You have a functioning setup with 1 admin user. The problem is, your users don’t have a way of getting to the registration page, or back to GlotPress if they do make it to the registration page. So this next section will detail the customizations I made.

    Customizing GlotPress

    Let People Register
    Anybody who lands on your GlotPress install would have no idea where to go to register since the only link in the top right corner says “Log in”. To fix that, I modified /gp-templates/header.php and added two links; Register and Lost Password. The register link points to the root of the WordPress install (I’ll explain further in a minute as to why) and the lost password link points to the standard WordPress last password page.

    While I was editing the header, I also removed the GlotPress logo and replaced it with the 9seeds logo.

    Custom Theme for WordPress
    I really wasn’t looking to make a big production out of this project. So, I decided to create a custom child theme based on Genesis. For the stylesheet, I copied the style.css that was included in GlotPress and used that as the starting point. I then created two quick functions to modify the header and footer to also match the look of GlotPress. I created both an index.php and page.php that have the same layout in order to keep the experience consistant. I’ll confess that I took the simple route and hard-coded the links for Register – Lost Password – Log in as to keep the look matching for non-logged in users.

    Gravity Forms + User Registration add-on
    I made a quick form using Gravity Forms and added it to a page. I then forced that page to be the home page on the site as it’s really the only thing I want users doing on the WordPress side of things. I used the User Registration add-on to auto-create subscriber level users so even if they do log in to WordPress, they can’t really do much.

    Clean Up the Email
    Since I don’t want new users being redirected back to the WordPress install, I created a quick add-on plugin that will filter the new user welcome email. I point the users back to the GlotPress install rather than to WordPress. This was also a great place to include information about where to get support if needed.

    if ( !function_exists('wp_new_user_notification') ) {
    	function wp_new_user_notification( $user_id, $plaintext_pass = '' ) {
    
    		$message  = __('Hi there,') . "\r\n\r\n";
    		$message .= __("Welcome to 9seeds Translations! Here's how to log in:") . "\r\n\r\n";
    		$message .= 'http://translate.9seeds.com/login' . "\r\n";
    		$message .= sprintf(__('Username: %s'), $user_login) . "\r\n";
    		$message .= sprintf(__('Password: %s'), $plaintext_pass) . "\r\n\r\n";
    		$message .= __('If you have any problems, please contact support at http://support.9seeds.com/.') . "\r\n\r\n";
    		$message .= __('Cheers!');
    
    		wp_mail($user_email, __('Your 9seeds translations login info'), $message);
    
    	}
    }
    

    Redirect Users
    Since I didn’t really want users logging in to the WordPress dashboard, why not redirect them if they try? In my handy little plugin, I added the following chunk of code to send non-admins back to GlotPress:

    function glot_admin_redirect() {
    	if ( ! current_user_can( 'manage_options') ) {
    		wp_redirect( 'http://translate.9seeds.com/' );
    		exit;
    	}
    }
     
    add_action('admin_init', 'glot_admin_redirect');
    

    The only thing I haven’t done at this point that I’ll probably end up doing later is to redirect the lost password form to a front-end page as well. Not to hide the fact that it’s WordPress, but more to keep the user experience smooth and have all the pages have the same look and feel.

    So there you have it. That’s our setup for GlotPress. Is there any other customizations you’ve done on your own that you’d like to share? I’d love to hear about them in the comments below.

    Continue Reading

    john

      More by john

      Inserting yourself as admin into WordPress

      Posted on February 28, 2013

      On quite a few occasions I’ve had clients send me a complete backup of their site during the discovery period. Usually this is because they don’t have a Release Candidate / Quality Assurance / Staging / Development version(s) of their site where changes can be made, and approved, without affecting the live site.

      Without standing on my soapbox too long – if your website lacks a staging site, version control for custom code, or backups – you should address them immediately.

      In this case, I was glad the client had at least one backup (the one that was provided to me) which I could turn into a local WordPress installation to begin development. Since the client didn’t provide a WordPress Admin user and password, I just decided to insert myself into WordPress.

      Continue Reading

      justin

        More by justin

        Moving forums from SimplePress to BBPress

        Posted on February 4, 2013

        I was recently asked by a member of our local WordPress meetup group which forum software I would suggest using. I mentioned that I had been using SimplePress for a while, but wasn’t in love with it. I had used BBPress quite a while ago, before it got the major revamp and if I had to choose which to use for a new site, I would go with BBPress. Then, with a stroke of great timing, the BBPress 2.3 beta was released the following day. Since it was fresh in my mind, I installed the beta to test it out. In short, BBPress has come a LONG way in the past year. So much so that we decided it was time to move our support forums off of SimplePress. That process would prove to be tricky.

        To follow are the steps I took to convert our forums from SimplePress version 4.4.0 to BBPress version 2.3

        Step 0

        Backup All The Things

        Seriously. Just do it.

        I went one step further than just backing everything up. Instead, I exported the database and set up a separate WordPress install just to run the conversion. This way, if everything broke I could simple delete it and start again. And now the actual conversion process.

        Step 1: Upgrade SimplePress

        When figuring out what it would take to do the conversion, I found that BBPress could convert SimplePress version 5 forums right from the tools menu. So in order to do the conversion, I first needed to upgrade SimplePress. Unfortunately, their upgrade only works with version 4.5.x. After reading this page, I took these steps:

        – Deactivate the SimplePress plugin (Do Not uninstall it, just deactivate it)
        – Remove the /plugins/simple-forum/ folder from your server
        – Download the latest version of SimplePress
        – Upload simple-press folder to /plugins/simple-press/ on your server
        – Activate the plugin

        Once the plugin is activated, you’ll have the “Forums” item added back to your menu which will link you to an upgrade process. Start the upgrade process and let it run. For our small forum this process took 3-4 minutes. I’m assuming for a larger forum, this process could take a bit longer. Be patient.

        After I ran the update, poking around the forums admin area, everything looked fine. I then checked the actual forums and found this message:

        SP error

        I was concerned that I had lost all my data, but the forum stats displaying below gave me some comfort.

        Forum Stats


        Step 2: Install BBPress

        Not wanting BBPress and SimplePress to colide, I started by deactivating SimplePress. I then uploaded the BBPress 2.3 beta to /plugins/bbpress/ and activated it from the plugins menu.

        Yeah, that part was pretty simple.

        Step 3: Import SimplePress forums

        Just a quick note. At the time of this writing BBPress 2.3 beta 2 has a bug related to importing of data. I posted a ticket about it in Trac and I’m sure it will be fixed soon. To get around the bug, I ran a search and replace on the database to remove any instance of   as it causes the post to be truncated upon import.

        Start by going to Tools -> Forums in the WordPress admin area, then click the Import Forums tab at the top. From the dropdown select SimplePress 5 and then fill in the database information. Just under that you’ll see a few options. The most important of which is the Convert Users option.

        The first time I ran the import, I was installing BBPress on the same WordPress installation that SimplePress had previously been installed on. This meant that all my user accounts already existed and their posts were all connected to them. I clicked the convert users tab prior to running the import, and all the posts, once converted, were once again attached to their rightful owners as part of BBPress.

        I then decided that I wanted to move my forum to a different WordPress install on a different domain. When doing so, I accidentally forgot to click the Convert Users checkbox. The results were less than optimal. All of the posts DID come over to the new installation, but they were all attached to a single user account. Oops.

        I can’t think of a reason (although, I’m sure there is one or this wouldn’t be an option) why you would ever want to NOT click the Convert Users checkbox. So before you click Start, make sure it’s checked.

        Step 4: Repair Forums

        After running the conversion in step 3, I was reviewing the forums and noticed that all the data appeared to be in place and the posts were all attached to the proper people, but, all of the counts were off. Anywhere where it said how many posts or replies were on a post or topic was all displaying zero. Back to the admin area we go. This time to Tools -> Forums and click the Repair Forums tab where you will find the following options:

        Repair Forums

        Taking the advice along the top, I clicked the first item in the list and then clicked Repair Items. It took a matter of seconds to complete. I then went through each item on the list, one at a time, and checked the box and ran the repair. When I was done I went back to the forums to find that all the counts had been updated and my forums were working perfectly.

        Once you know all the pieces, the process isn’t actually all that difficult. But hopefully I just saved you some trial and error time.

        Done Done. (as Chris Lema would say)


        Continue Reading

        john

          More by john

          Including templates inside a plugin

          Posted on December 17, 2012

          This past week I was working on a project for a client who needed a custom post type to manage events on his site. Normally for a project like this I would build the CPTs and push a couple templates in to the active theme folder. But in this instance, the client was working on a new theme that would be going live in a few weeks. Rather than making the client jump through hoops and move template files around, I wanted to provide the easiest solution possible. That meant, including all the templates as part of the plugin. Thanks to a very handy filter in WordPress, this wasn’t a problem. Here’s how it ended up.

          Here’s the makeup of the plugin:

          Plugin Layout

          The plugin itself is very standard. One thing I like to do is define the custom post types as separate files to keep the function file clean. I then include the CPTs and the custom metabox library like so:

          /** Add custom CPTs and Metaboxes */
          require_once( 'cpt-events.php' );
          require_once( 'cpt-locations.php' );
          require_once( 'metabox/init.php' );
          

          I store the stylesheet in a separate folder for cleanliness as well and encode it like this:

          /** Enqueue CSS */
          add_action( 'wp_enqueue_scripts', 'prefix_add_my_stylesheet' );
          
          function prefix_add_my_stylesheet() {
          	wp_register_style( 'cpt-style', plugins_url( 'css/style.css', __FILE__) );
          	wp_enqueue_style( 'cpt-style' );
          }
          

          And now the real meat of it. You can see the single-events.php and archive-events.php that make up the two template files I want to use on the front end. What I’m going to do is create a function that tells WordPress to use my templates for the archive and single pages for the event CPT. That code looks like this:

          // force use of templates from plugin folder
          function cpte_force_template( $template )
          {	
              if( is_archive( 'events' ) ) {
                  $template = WP_PLUGIN_DIR .'/'. plugin_basename( dirname(__FILE__) ) .'/archive-events.php';
          	}
          	
          	if( is_singular( 'events' ) ) {
                  $template = WP_PLUGIN_DIR .'/'. plugin_basename( dirname(__FILE__) ) .'/single-events.php';
          	}
          	
              return $template;
          }
          add_filter( 'template_include', 'cpte_force_template' );
          

          As you can see, I’ve set up a filter for template_include. I pass in the $template variable and check to see if the page is either an archive or singular event. If so, I override the default template location with the full path and file name of the file inside my plugin folder.

          The end result is a fully encapsulated plugin that takes care of the functionality, templates and stylesheet formatting the client requested all in one easy to manage package. Simply install the plugin and activate it and you’re ready to go!

          Continue Reading

          john

            More by john
            • Prev
            • Page 1
            • Page 2
            • Page 3
            • Page 4
            • Page 5
            • Next

            Footer

            Get in Touch

            • New Project Inquiry
            • Product Support and General Inquiry
            • Store Purchase Terms and Conditions
            • Store FAQ
            • Cookie Policy
            • Privacy Policy

            Our Services

            • Custom WP Development
            • Theme Store
            • Plugin Store

            WordPress Plugins for Sale

            • Time Tracker
            • Authorize.net SIM Gateway

            WordPress Plugins for Free

            • Simple Calendar
            • WP Chargify
            • Facebook
            • Twitter
            • LinkedIn
            • WordPress
            • GitHub

            Copyright 2025 | 9seeds, LLC

            Like nearly all websites this one uses cookies too. Like most users we think consent banners like these are a dumb solution, but it's what we've got until new laws are passed. We use cookies on our website for remembering your preferences, for example if you're logged in or what is in your cart. We also use 3rd party cookies for analytics so we know what pages on the site are most popular. By clicking “Accept”, you consent to the use of ALL the cookies.
            Do not sell my personal information.
            Cookie SettingsAccept
            Manage consent

            Privacy Overview

            This website uses cookies to improve your experience while you navigate through the website. Out of these, the cookies that are categorized as necessary are stored on your browser as they are essential for the working of basic functionalities of the website. We also use third-party cookies that help us analyze and understand how you use this website. These cookies will be stored in your browser only with your consent. You also have the option to opt-out of these cookies. But opting out of some of these cookies may affect your browsing experience and may even preclude you being able to login to the website.
            Necessary
            Always Enabled
            Necessary cookies are absolutely essential for the website to function properly. These cookies ensure basic functionalities and security features of the website, anonymously.
            CookieDurationDescription
            __stripe_mid1 yearThis cookie is set by Stripe payment gateway. This cookie is used to enable payment on the website without storing any patment information on a server.
            __stripe_sid30 minutesThis cookie is set by Stripe payment gateway. This cookie is used to enable payment on the website without storing any patment information on a server.
            cookielawinfo-checkbox-advertisement1 yearSet by the GDPR Cookie Consent plugin, this cookie is used to record the user consent for the cookies in the "Advertisement" category .
            cookielawinfo-checkbox-analytics1 yearSet by the GDPR Cookie Consent plugin, this cookie is used to record the user consent for the cookies in the "Analytics" category .
            cookielawinfo-checkbox-necessary1 yearSet by the GDPR Cookie Consent plugin, this cookie is used to record the user consent for the cookies in the "Necessary" category .
            cookielawinfo-checkbox-others1 yearSet by the GDPR Cookie Consent plugin, this cookie is used to store the user consent for cookies in the category "Others".
            cookielawinfo-checkbox-performance1 yearSet by the GDPR Cookie Consent plugin, this cookie is used to store the user consent for cookies in the category "Performance".
            Functional
            Functional cookies help to perform certain functionalities like sharing the content of the website on social media platforms, collect feedbacks, and other third-party features.
            Performance
            Performance cookies are used to understand and analyze the key performance indexes of the website which helps in delivering a better user experience for the visitors.
            Analytics
            Analytical cookies are used to understand how visitors interact with the website. These cookies help provide information on metrics the number of visitors, bounce rate, traffic source, etc.
            CookieDurationDescription
            _ga2 yearsThe _ga cookie, installed by Google Analytics, calculates visitor, session and campaign data and also keeps track of site usage for the site's analytics report. The cookie stores information anonymously and assigns a randomly generated number to recognize unique visitors.
            _gid1 dayInstalled by Google Analytics, _gid cookie stores information on how visitors use a website, while also creating an analytics report of the website's performance. Some of the data that are collected include the number of visitors, their source, and the pages they visit anonymously.
            CONSENT2 yearsYouTube sets this cookie via embedded youtube-videos and registers anonymous statistical data.
            Advertisement
            Advertisement cookies are used to provide visitors with relevant ads and marketing campaigns. These cookies track visitors across websites and collect information to provide customized ads.
            CookieDurationDescription
            VISITOR_INFO1_LIVE5 months 27 daysA cookie set by YouTube to measure bandwidth that determines whether the user gets the new or old player interface.
            YSCsessionYSC cookie is set by Youtube and is used to track the views of embedded videos on Youtube pages.
            yt-remote-connected-devicesneverYouTube sets this cookie to store the video preferences of the user using embedded YouTube video.
            yt-remote-device-idneverYouTube sets this cookie to store the video preferences of the user using embedded YouTube video.
            Others
            Other uncategorized cookies are those that are being analyzed and have not been classified into a category as yet.
            CookieDurationDescription
            cookielawinfo-checkbox-functional1 yearThe cookie is set by GDPR cookie consent to record the user consent for the cookies in the category "Functional".
            SAVE & ACCEPT
            Powered by CookieYes Logo