• Skip to primary navigation
  • Skip to main content
  • Skip to footer
  • Store
  • Support
  • Theme Documentation
  • My Account
  • Cart

9seeds

Building Custom WordPress Solutions | Plugin Development

 
  • Custom Development
  • Themes
  • Plugins
  • About
  • Contact
  • Blog

Tech Talk

Pretty PHP Date Ranges

Posted on December 28, 2013

Pretty PHP Date Ranges

Last week I needed to come up with a way to display a pretty date range based on a starting and ending date in PHP. It’s simple enough use PHP’s date function to convert a unix timestamp into a pretty date format, but PHP doesn’t have a built in function to format date ranges.

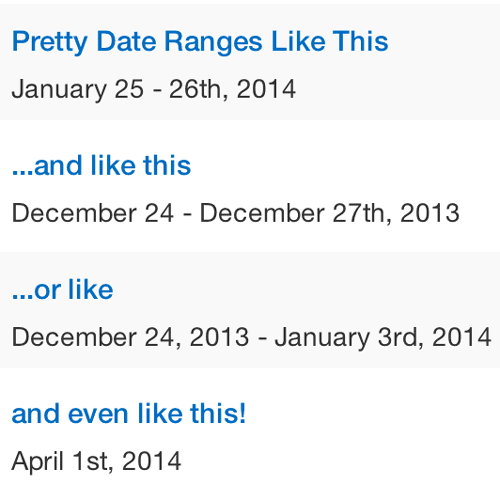
The goal was to take two unix time stamps and output a range that looks like this:

January 25 – 26th, 2014

This sounds and is simple until you take into account that sometimes it crosses months and needs to look like this:

January 25 – February 2nd, 2014

or could cross years like this:

December 25th, 2013 – January 3rd, 2014

So here is the code to build those prettified date ranges:


 * @since 1.0
 */

function jb_verbose_date_range($start_date = '',$end_date = '') {

    $date_range = '';

    // If only one date, or dates are the same set to FULL verbose date
    if ( empty($start_date) || empty($end_date) || ( date('FjY',$start_date) == date('FjY',$end_date) ) ) { // FjY == accounts for same day, different time
        $start_date_pretty = date( 'F jS, Y', $start_date );
        $end_date_pretty = date( 'F jS, Y', $end_date );
    } else {
         // Setup basic dates
        $start_date_pretty = date( 'F j', $start_date );
        $end_date_pretty = date( 'jS, Y', $end_date );
        // If years differ add suffix and year to start_date
        if ( date('Y',$start_date) != date('Y',$end_date) ) {
            $start_date_pretty .= date( 'S, Y', $start_date );
        }

        // If months differ add suffix and year to end_date
        if ( date('F',$start_date) != date('F',$end_date) ) {
            $end_date_pretty = date( 'F ', $end_date) . $end_date_pretty;
        }
    }

    // build date_range return string
    if( ! empty( $start_date ) ) {
          $date_range .= $start_date_pretty;
    }

    // check if there is an end date and append if not identical
    if( ! empty( $end_date ) ) {
        if( $end_date_pretty != $start_date_pretty ) {
              $date_range .= ' - ' . $end_date_pretty;
          }
     }
    return $date_range;
}

Also available on GitHub/Gist here.

To actually use that in WordPress you’d just add something like this in your template file where you wanted to output the date, here based on two custom field values.

';
     echo jb_verbose_date_range( $start_date , $end_date );
     echo '';
}
Continue Reading

Jon Brown

    More by Jon Brown

    Sticky Footer for Genesis

    Posted on November 29, 2013

    glue-bottleWe had a client request that their site’s footer be fixed to the bottom of the browser window for “short pages” or pages with little content. A good example of how to accomplish this with HTML and CSS is available at: http://css-tricks.com/snippets/css/sticky-footer/. If you’re using the Genesis framework for WordPress however, a couple more steps are required to get the sticky footer working.

    For this example, we’re using the Genesis sample theme, but it should work for any theme available from StudioPress with minor CSS adjustments to .site-footer height and .page-wrap margin-bottom.

    You’ll only need to work with two files: functions.php and style.css. The code for each section is listed below. Note that this solution will likely not work in IE8 or Opera, where a javascript solution may be needed (see Ryan Fait’s sticky footer example for an alternative method that is not Genesis-specific).

    Your mileage may vary. Feel free to leave your modifications and suggestions in the comments.

    Sticky footer for genesis screenshot

    Functions.php

    //* Sticky Footer Functions
    add_action( 'genesis_before_header', 'stickyfoot_wrap_begin');
    function stickyfoot_wrap_begin() {
    	echo '
    '; } add_action( 'genesis_before_footer', 'stickyfoot_wrap_end'); function stickyfoot_wrap_end() { echo '
    '; }

    style.css

    html, body {
    	height: 100%;
    }
    
    .site-container {
    	height: 100%;
    }
    
    .page-wrap {
    	min-height: 100%;
    	/* equal to footer height */
    	margin-bottom: -90px; 
    
    }
    
    .site-inner {
    	min-height: 100%;
    	/* equal to footer height */
    	margin-bottom: -90px; 
    }
    
    .site-footer, .site-inner:after {
    	/* .site-footer and .site-inner:after must be same height as .site-inner */
    	height: 90px; 
    
    }
    
    .site-footer {
    	background: orange;
    	/* Use this for testing */
    }
    
    Continue Reading

    Corey Scribner

      More by Corey Scribner

      Developing WordPress Locally – Part 3

      Posted on November 25, 2013

      This is the 3rd post in a 3 part series. You can find the first two posts here and here.

      The previous two posts talked about getting set up to work on your WordPress website on your local machine, allowing you to build your site offline. In this final post in the series, I’m going to show you how to launch your new site live to the world.

      Tools

      My development is being done on a Mac, and my tools reflect that. If you’re developing on Windows, you’ll need to find alternate tools, but that shouldn’t be an issue.

      • DesktopServer
      • Transmit
      • WP Migrate DB Pro

      Before we dive in

      Since the process is a bit different for sites that are brand new Vs a site that already exists and you’re simply doing updates, I’ll go ahead and walk through both processes.

      If you are not using DesktopServer, but are using something like MAMP for your local hosting, option 1 won’t apply to you, but, you should be able to use option 2 just fine.

      I’ll also note that I am assuming you already have a hosting account and that you know how to install WordPress on it. Since most hosting companies these days have a one-click install for WordPress, that shouldn’t be a big deal. But if your host doesn’t offer one-click install, check out this article about installing WordPress.

      And finally, since this is only an example walk through, I am not actually launching a site to a live domain. So in any screenshots where you see example.9seeds.com, that’s the location that is acting as our LIVE website URL.

      Option 1: Brand New Website

      Alright, you finally built your website and now it’s time to launch it. Let’s begin.

      Step 1: Install DesktopServer plugin

      Log in to your live site, which at this point should just be a default WordPress install. Go to the plugins page and install the DesktopServer plugin. Once it’s installed, activate the plugin.
      ds-plugin

      Step 2: DesktopServer

      From the DesktopServer menu, select “Export, import or share a website” and click next. On the next screen, choose “Export or deploy a WordPress website.” and click next. On the 3rd screen select the “From Website” (your local dev install) and “Export as” (your live domain name) and then click the “Direct deploy to an existing server.” radio button. When you do, a pop-up will come up asking for your WordPress user credentials for your live site. Fill those in and hit submit. You will get a 4th page with options on what you want to do next. I leave things as they are with the top two options checked. Click next and then DesktopServer will get to work.

      IMPORTANT: This is going to delete any WordPress data you have on your live site and replace it with everything you have on your local site. Fair warning!

      Depending on the size of your site, this can take a while, so be patient.
      ds-exportds-export-2ds-datads-launch

      Step 3: Save Permalinks

      Once DesktopServer says it’s done, the final step in the process is to log in to the live WordPress site and go to Settings -> Permalinks and click the save button. This needs to be done so that WordPress will generate the .htaccess file for you so your permalinks will work.

      Remember, your username and password to access the site will be the same as it is to access your local development site.
      permalinks

      That’s it. Your new site is ready to go!

      Option 2: Updating an existing site

      In this version, we’re going to assume your site is already live, but you’ve now made some changes and you want to push those up to your live server.

      Step 1: Transmit

      First up, we need to upload any new themes, plugins or images that we’ve created locally. I do this by connecting to my live server with Transmit and highlight wp-content folder on both local and live. I then click the Sync button.
      tr-sync1

      On the next screen, you’ll want to make sure that the arrow (1) is pointing from your local server to the dev server. The proper folders (2) have been selected. Simulate the sync (3) is selected. Click the Syncronize button and Transmit will compare the local and live folders and report back what has changed. The great part about the sync tool, instead of having to upload all 1500+ files, it’s only going to upload the 107 files that are changed. This is a big time saver.
      trans-sync-2tr-changed

      Step 2: WP Migrate DB Pro

      When using WP Migrate DB Pro, it’s important to remember that this step is going to wipe out your existing database. So, if you have a ton of traffic and comments and don’t want to lose those by pulling a copy of your local database up to your live database, you may want to instead simply open two browsers and copy/paste from the local to the live any changes you’ve made. BUT, if you are fine with making your live database match your local database, then this is the process for you.

      On the live site, go to Tools -> Migrate DB Pro. On the Settings tab, check the box for ‘Accept push requests’ and then copy the connection info to the clipboard.
      migrate-live

      On the local site, go to Tolls -> Migrate DB Pro. On the Migrate tab, select the “Push” radio button and paste in the connection info from the clipboard. Then click Migrate DB.
      migrate-local

      You are done! Your live site should now match your local site.

      I hope you’ve enjoyed this series on Developing WordPress Locally. If you have any questions or comments or just want to share your own process, please leave a note in the comments!

      Want More?

      – Read Part 1 of this series
      – Read Part 2 of this series
      – Sign up for our newsletter

      Continue Reading

      john

        More by john

        Developing WordPress Locally – Part 2

        Posted on November 17, 2013

        In Part 1 of this series I shared the process I go through to set up a local WordPress workspace for developing client websites when we are starting from scratch. In this post I will show you how I set up a workspace for clients who already have an existing website.

        While I am explaining this as a process for working on a client’s website, this is also a great way to run a development version of your own website. It will allow you to try out plugins and themes using your real data so you can see exactly how it will work BEFORE you push it live.

        Since many of the tools and steps I am going to use are the same as they are in Part 1 of this post series, I may gloss over details that are covered more in-depth in the previous post.

        Tools

        As I said before, I am developing on a Mac. Many of the tools I use are Mac specific. If you are on a PC, the concepts will be the same, but you may need to find a comparable tool.

        Here’s the list of tools I’ll be using:

        • DesktopServer
        • Tower
        • Transmit
        • bitbucket.org
        • WP Migrate DB Pro
        • Uploads by Proxy

        Before you get started

        By now you should have already collected the FTP information and WordPress admin login credentials for the site you’re working on. If not, do that now. I’ll also mention that having a BitBucket account isn’t a requirement for what I’m going to show you here, but it is part of MY process, so I’m leaving it in, but you can skip that part if you’d like. OK, I think we’re set. Let’s do this!

        Aaaaand Go

        Just like I said in the previous post, I’m going to break up the process in to a number of ‘steps.’ Each time there’s a new step, that simply means we are changing applications. In my head, this makes the most sense for breaking up this post in to digestible segments.

        Step 1: Desktop Server

        First thing we’re going to do is set up a copy of WordPress to work on locally. In DesktopServer, start by choosing the ‘Create a new development environment’ radio button. On the next screen you will enter a site name and in the Blueprint dropdown choose the latest version of WordPress and click continue. After the install is complete, click Done and you’ll see the congratulations screen with a link to your new local WordPress install. Click the link to finish the WordPress install in the browser.
        Create Siteds-new-siteds-congrats

        Note: DesktopServer lets you create your own ‘Blueprints.’ These are folders that contain the default WordPress install and you can add your own default themes and plugins. As an example, I have the latest version of Genesis in the theme folder and I have a handful of plugins I use for development in the plugins folder. This is a nice time saver when setting up a dev environment.

        Step 1.5

        You may have noticed in my screenshot, my Desktop Server Blueprint is out of date. Because I installed an older version of WordPress, and some of my plugins are out of date, my next step is to log in to my new local WordPress install and update WordPress core and all plugins directly from the WordPress admin area. Just because we are working locally, there’s no need for us to jump through any crazy hoops to update WordPress. I love that about Desktop Server.

        Step 2: Transmit

        In Transmit, I create a new connection profile and fill in the details for my client’s website. I then connect to the server and I download everything from their wp-content/themes/ folder and wp-content/plugins/ folder. I store these in the matching folders inside our newly created website on our local machine.
        transmit-createtransmit-folders

        Note: If the site I am working on doesn’t have a huge amount of files in the uploads folder, I will go ahead and download that now as well. But, if it does have a large number of files, I will instead use the Uploads By Proxy plugin, which I will explain in a later step.

        Step 3: WP Migrate DB Pro

        If there is one plugin that saves me the most amount of time, it has to be WP Migrate DB Pro. We are going to use the plugin to mirror our live site on our local install.

        Start by installing the WP Migrate DB Pro plugin on both your live site and your local installation.

        On the live website, in the WordPress dashboard, go to Tools -> Migrate DB Pro. Click the Settings tab at the top. On the resulting screen click the “Accept pull requests allow this database to be exported and download” checkbox. Then, highlight and copy the information in the ‘Connection Info’ box.
        migrate-live

        On the local website, in the WordPress dashboard, go to Tools -> Migrate DB Pro. On the Migrate tab, click the ‘Pull’ radio button and paste in the connection info you copied a second ago. You do not need to click the ‘connect’ button. After a second you should see a screen that looks similar to this:
        migrate-local

        Click the ‘Migrate DB’ button at the bottom and the plugin will start pulling a copy of the live database and using it to replace your local database. It will also update all the website URL references and path references based on what it auto-detected. You can see that in the screenshot just above. When it’s done, you’ll see a confirmation message like this one:
        migrate-done

        47 seconds. Done and done.

        Important Note: Your local database and your live database are the same. This means that the username and password that you set up locally in Step 1 above will no longer work. You need to log in using a username/password that existed on the live website.

        At this point, we’re done touching the live website. All further steps in this process are done on your local WordPress installation.

        Step 4: Uploads by Proxy

        If you downloaded the /wp-content/uploads/ folder in step 2, you can skip ahead to Step 5.

        When a client has a large number of files in their uploads folder, rather than spending time waiting for them all to download and taking up space on my hard drive, the Uploads by Proxy plugin comes to the rescue. Install the plugin and activate it.

        Open Sublime Text 2 and open your wp-config.php file located in the root folder of your WordPress install. Add the following two lines to your wp-config file, just about where it suggests you stop editing.
        define(‘WP_SITEURL’, ‘http://ignitevegas.com’);
        define(‘UBP_SITEURL’, ‘http://ignitevegas.com’);
        Like this:
        sublime-ubp

        Now our local site is displaying images directly from the live site. Here’s a before and after:
        ubp-beforeubp-after

        OK, one final warning about Uploads by Proxy. If you are planning to do development on your local computer from a location where you won’t have an internet connection, then using Uploads by Proxy is a bad idea! Go back and download the uploads folder instead.

        Technically speaking, you are ready to start working on your site. However, before I get started I like to create a BitBucket repo and store a copy of the site files as they are now before I do any work. It’s always nice to have a rollback point in case something goes horribly horribly wrong. That being said…

        Step 5: Tower

        Before I create my local repo, I save a copy of this file in to the root folder of my local WordPress install and rename it to .gitignore (It has to be named exactly like that. See the explanation in the first post if needed.

        From the Tower dashboard, click the “Create Local Repository” link. In the pop-up, click Browse to select the root folder for your local WordPress install. Give it a proper title and click OK.
        tower-localrepo

        Once the repo is created, double click it and you should see something similar to this:
        tower-new-repo

        I then do an initial commit of the .gitignore file and the wp-content folder. I do this by clicking the ‘Stage all’ button, clicking ‘commit’ and in the pop-up I type in ‘initial install’
        tower-initial-commit

        Step 6: BitBucket

        In my bitbucket.org account, I create a new BitBucket repo. Like this:
        bitbucket-create

        Once the repo is created I select the Clone button and switch the second dropdown to SSH. In the screenshot below you’ll see that in the highlighted area it says ‘git clone git@bitbucket…’. We don’t actually need the ‘git clone’ portion. We want to copy everything after that. In this example, that’s going to look like this: [email protected]:9seeds/ignite-vegas.git Once we have that copied to the clipboard, we’re done with bitbucket.
        bb-clone

        Step 7: Tower

        Now I’m going to add BitBucket as a ‘remote’ so that I can store a copy of the code in a central location for myself and my team to access later on. I do this by right-clicking on ‘Remotes’ and in the pop-up, I fill type in ‘BitBucket’ as the name of the remote and then paste in the info I copied in the previous step. I select Private Key from the dropdown and click OK.
        tower-remote

        The last step is to drag the ‘master’ branch on to the ‘BitBucket’ Remote. This will do an initial push of our local repository up to BitBucket. In the pop-up window, make sure to have the ‘Track this new remote branch’ checked and then hit OK.
        tower-track

        Alright, NOW you are really done. Now it’s time to open up your editor and get to work.

        Sign up for the 9seeds.com newsletter to make sure you catch next week’s final post in the series where I’ll cover how we take the work we’ve done locally and push it to the live server.

        Want More?

        – Read Part 1 of this series
        – Read Part 3 of this series
        – Sign up for our newsletter

        Continue Reading

        john

          More by john

          Developing WordPress Locally – Part 1

          Posted on November 10, 2013

          One question that I get asked a lot is “What is your process for developing sites on WordPress?” I get asked it so often, I figured it was about time that I write it up. Plus, it’s a great question. It’s one I love to ask other developers, too. I don’t think there is such a thing as a perfect setup. I don’t submit this as the best way to develop locally. I submit it solely as how I develop locally. Your milage may vary.

          This will end up being a 3 part series of posts. Part 1 will cover starting from scratch. Meaning, creation of a brand new WordPress site. In Part 2 I will cover how to set up a local development site for an existing website. And, in Part 3, I will talk about how I deploy sites live after we’re done.

          Tools

          I use a number of tools, all of which are Mac based. Some have PC versions and some you will need to go in search of a substitute if you aren’t on a Mac. Some of the tools I use have both free and paid versions. If there is a paid version, that’s the one I’m using. Keep that in mind if you’re not seeing the exact screen or menu items, you may just need to upgrade. These are tools that are going enable you to do the work that makes you money. Pay for them. </soapbox>

          That being said, here’s the list of tools I used (in no real order):

          • Desktop Server
            Used for setting up and running WordPress locally. It handles the setup and configuration of PHP, MySQL and Apache.
          • Tower
          • Used for pushing code to our Git repository and to our staging site for client review.
          • Terminal
          • Used for two quick pieces of setup.
          • Finder
            Used to copy a bunch of files.
          • Chrome
            Used for installing WordPress general browsing, of course.
          • PHPMyAdmin
            Used to set up a database for the local site.
          • bitbucket.org
            Our online Git repository. I’ll refer to this as a ‘repo’ or ‘bitbucket’ interchangeably throughout the post.
          • wpengine.com
            Where we host the staging site for clients review. I’ll refer to this as the ‘staging site’ throughout the post.

          A quick side note about WPEngine and what I refer to as a staging site. WPEngine offers a simple way of copying your live site to a secondary location called a staging site for the purpose of doing testing. However, my use of the word ‘staging site’ in this post does not specifically mean that I’ve copied the ‘live’ code to a ‘staging’ area. For my specific use, I rarely have the need for both a live and staging version on WPEngine during the development process. So, I rarely use the WPEngine ‘staging’ functionality and instead use what would be considered the ‘live’ environment as a staging environment. So when I say ‘staging’, I simply mean ‘wpengine’ in general. How you decide to use WPEngine and their live/staging environments is entirely up to you.

          Before you get started

          In order to use Git for pushing your code to your repo and to your staging site, you will need to set up SSH keys and you need to submit your SSH public key to WPEngine. There are excellent tutorials for doing both of those things here and here, so I won’t bother explaining that portion. Just know that I assume you have already created SSH keys and have submitted them to WPEngine before moving forward.

          Ready, Set, Go

          OK, we’ve got our tools. We’ve got our accounts. We have a client. It’s time to get started.

          Hey now, another side note: I’m going to break up the process in to a number of ‘steps.’ Each time there’s a new step, that simply means we are changing applications. In my head, this makes the most sense for breaking up this post in to digestible segments.

          Step 1: Desktop Server

          I’m about to walk you through what is going to look like the most complicated way to install WordPress ever. But I promise, there is a method to my madness.

          In Desktop Server, start by choosing the ‘create a new development environment’ radio button. On the next screen you will enter a site name (I typically use the client’s name or the actual domain name if we know what it’s going to be), and in the Blueprint dropdown, I choose ‘Blank (non-WordPress)’. We’ll install WordPress manually in a minute. What we’re really doing at this point is setting up the local DNS entries and folders so we can access the site in a browser.

          Create SiteBlank Setup

          Step 2: Terminal

          One thing that Desktop Server does that I wish I could change is that it creates an index.html file inside the new site folder when you create a blank site. It makes sense for them to do it as it closes the loop for users to validate that the setup worked. But for me, it creates an extra step.

          To remove the index.html file, I use terminal and run the following two commands:

          • cd /websites/clientname.dev/
          • rm index.html

          Your path name will likely be different. I set up a symlink to point /websites/ to my DesktopServer websites folder.

          I use Terminal instead of Finder because when you use ‘Move to Trash’, your Mac will add a DS_Store file to the directory. For an upcoming step we need to have the folder be completely empty. If you know of a better way, please leave a comment below.

          Step 3: bitbucket.org

          Next I set up a new repository on our bitbucket.org account. Click the ‘Create’ button and on the resulting page all of the presets are fine. I fill in the name for the new repo and (sometimes) I fill in the description and click the ‘Create Repository’ button to continue.
          BitBucket New Repo

          Once the repo is created I select the Clone button and switch the second dropdown to SSH. In the screenshot below you’ll see that in the highlighted area it says ‘git clone git@bitbucket…’. We don’t actually need the ‘git clone’ portion. We want to copy everything after that. In this example, that’s going to look like this: [email protected]:9seeds/client-name.git Once we have that copied to the clipboard, we’re done with bitbucket for now.
          Bitbucket Clone

          Step 4: Tower

          From the Tower dashboard click the ‘Clone Remote Repository’ button. Paste our clipboard in to the top box titled ‘Repository URL’. The Bookmark Title is for your use only. You can change this to be something human readable. In the Authentication dropdown select ‘Private Key.’ and in the ‘Clone To:’ box, click the Browse button and select the /websites/clientname.dev/ folder.
          Tower Clone Remote

          If you try to clone the repository in to a folder that is not empty, Tower will not let you move forward. This is where Step 2 came in to play.

          If you double-click the new Client Name repo in Tower, you should see a blank repo that shows one item under the ‘Remote’ section called origin. This is our BitBucket repo. It will look like this:
          Tower Blank Repo

          Step 5: WPEngine

          Now we’re going to set up our staging area for our clients to view the work we do. I log in to my account at my.wpengine.com and click the ‘Add Install’ button. In the pop-up window, fill in the Installation Name field and click ‘save install’.

          IMPORTANT NOTE: the install names have to be unique across all of WPEngine. Because of that we add ‘9s’ to the end of all our install names. We do this for 2 reasons; 1) we know it’s going to be unique, 2) If you use your client’s name/domain/abbreviation, and later your client tries to use it, they won’t be able to. That seems rather rude. Make yours unique.
          WPEngine New Install

          Next, we need to request Git Push access for our new install. Hover over the Support link and click the ‘Open a Ticket’ link. You will then need to click the ‘No, open a support ticket’ link. Next, you will need to authenticate with Zendesk (follow the onscreen instructions. This has changed a couple times so I don’t want to post something that may be immediately outdated) and you’ll end up getting to the Open a Support Ticket page. You will need to fill out the Subject, Details and select which Install you want the access for. See the screenshot for an example of what to write.
          WPE Open a Ticket part 1WPEngine - Submit a ticket

          Once you submit the request to WPEngine, it will take some time before you receive an email back from them. I’ve had it take 3 minutes, 24 hours and all points in between. We don’t typically need this immediately, so we are safe to move on to the rest of the setup while we wait.

          Step 6: Chrome

          We are almost ready to install WordPress. But before we do, I like to add the .gitignore file to our empty folder. This file tells Git which files you want it to skip when pushing data to your repository. For me, I like to ignore all the WordPress core files and things like the /uploads/ folder. Mainly I want to keep everything in the /wp-content/themes/ folder and /wp-content/plugins/ as these are the two locations where I’m generally going to do all of my work.

          If you read the page where WPEngine talks about Git, you may have seen the section talking about .gitignore. They have two starter files that you can use. One which keeps the WP files in your repo and another that ignores the core files. It’s that second one that I’m going to use. You can find it here.

          Browse to that page and choose ‘Save page as’ from the menu. In the save dialog box, rename the file to .gitignore and select the clientname.dev folder and click save. You will get a warning about file names starting with a dot not being visible. That’s fine, click OK and continue.

          Note: Be sure it doesn’t add .txt to the end of your file name. It needs to be named .gitignore and not .gitignore.txt

          Make Gitignore

          Step 7: Finder

          We’re finally going to start the WP install. I have already downloaded the latest version of WordPress (3.7.1 as of this writing). In Finder I copy all the files and paste them in to the /websites/clientname.dev/ folder.
          Move WordPress files

          Step 8: PHPMyAdmin

          To set up a database for our new site, I use PHPMyAdmin. When you installed DesktopServer, they also set up PHPMyAdmin for you. You access it in a browser by going to http://127.0.0.1/phpmyadmin/

          First I click the ‘Databases’ button at the top. On the resulting page I create a database using a name that will be easy to remember. In this case I’ll use ‘clientname’.
          Make Database 1Make Database 2

          Step 9: Chrome

          Now it’s time to install WordPress proper. In a browser window visit the URL for your new site; http://clientname.dev/. If you have never installed WordPress manually, it’s very simple. If you have, you already know that. Here’s the basic steps:
          Screen 1: Click ‘Create a Configuration File’ button.
          Screen 2: Click ‘Let’s Go!’
          Screen 3: Fill in the Database Name, User Name and Password fields. It should look like the screenshot below.
          Screen 4: Click ‘Run the install’
          Screen 5: Fill in the Site Title, Username, Password, Email fields. I uncheck the ‘Privacy’ checkbox, but I don’t think it matters much either way.
          Screen 6: Technically you’re done. Log in if you’d like.
          WP InstallWP Install

          Step 10: Tower

          If you open up Tower again, it’s going to look like this:
          Tower Pre Commit

          You can see our .gitignore file and the wp-content folder. Perfect. We’re going to commit this as our initial release. We do that by first clicking the ‘Stage All’ button and then clicking the ‘Commit’ button at the top. In the pop-up window we’ll provide a descriptive submit message before we continue.
          Tower Staged filesTower Pre Commit

          Then, the next step is something we will only do one time ever. We’re going to drag our ‘Master’ branch on to our ‘origin’ in the remotes section. Here’s a video example of what I mean.

          What this is doing is making it so that our Bitbucket repo is the place where files will go when we click the ‘Push’ button in the future. I feel like this needs more explanation, but that could turn in to a whole other blog post. Let me just say that:

          Commit = store stuff in your local repository (as in, on your computer, not on bitbucket/wpengine)
          Push = send the files somewhere else. (we want our files to go to bitbucket for now. We’ll deal with wpengine shortly)

          If you were to go to Bitbucket now and look at the repo you created, you should now see something similar to this:
          Bitbucket Updated

          Step 11: Terminal

          I’m going to assume that enough time has passed that you’ve received the confirmation from WPEngine about your Git access. So the next step is to add WPEngine as a new remote location for our code. To do this I use the 4 commands below inside a Terminal window:

          cd /websites/clientname.dev/
          git remote add WPE-Production [email protected]:production/clientname9s.git
          git config remote.WPE-Production.gtSSHKey ~/.ssh/id_rsa
          git config remote.WPE-Production.gtAlwaysFetchAllTags true

          Keep in mind that you will need to modify the first 3 lines to point to your proper directory name on line 1, your wpengine install name on line 2 and your SSH Key ID on line 3 (if you used something other than id_rsa)

          If you open Tower again, instead of seeing one remote, you should now see two. Like this:
          Tower with 2 origins

          Step 12: Sublime Text 2

          Hey, it’s time to go and write some code. I’m going to assume you already know how to do that part. For my example, I’m going to go create a new theme for my client. I’ll do that by creating a folder at /websites/clientname.dev/wp-content/themes/client-theme/

          Step 13: Tower

          Now that we created our theme, we’re going to do two things. First we’re going to push our theme to Bitbucket for safe keeping. Then we’re going to push our changes to WPEngine to show the client. To do this, first we need to stage and commit our files just like we did in Step 10. But this time, instead of dragging ‘master’ on to ‘origin’, we only need to click the ‘Push’ button up top and select our destination.
          Tower PushPush to Master

          Now click ‘Push’ again, but this time choose ‘WPE-Production/master’ from the dropdown:
          tower-push-to-wpe

          That’s it. You are all set up to work on your site. You can now loop through steps 12 and 13 as many times as you need until the project is finished.

          If you have any questions about the process, or if you write up your own process and want to share, please leave a comment below.

          Want More?

          – Read Part 2 of this series
          – Read Part 3 of this series
          – Sign up for our newsletter

          Continue Reading

          john

            More by john
            • Prev
            • Page 1
            • Page 2
            • Page 3
            • Page 4
            • Page 5
            • Next

            Footer

            Get in Touch

            • New Project Inquiry
            • Product Support and General Inquiry
            • Store Purchase Terms and Conditions
            • Store FAQ
            • Cookie Policy
            • Privacy Policy

            Our Services

            • Custom WP Development
            • Theme Store
            • Plugin Store

            WordPress Plugins for Sale

            • Time Tracker
            • Authorize.net SIM Gateway

            WordPress Plugins for Free

            • Simple Calendar
            • WP Chargify
            • Facebook
            • Twitter
            • LinkedIn
            • WordPress
            • GitHub

            Copyright 2025 | 9seeds, LLC

            Like nearly all websites this one uses cookies too. Like most users we think consent banners like these are a dumb solution, but it's what we've got until new laws are passed. We use cookies on our website for remembering your preferences, for example if you're logged in or what is in your cart. We also use 3rd party cookies for analytics so we know what pages on the site are most popular. By clicking “Accept”, you consent to the use of ALL the cookies.
            Do not sell my personal information.
            Cookie SettingsAccept
            Manage consent

            Privacy Overview

            This website uses cookies to improve your experience while you navigate through the website. Out of these, the cookies that are categorized as necessary are stored on your browser as they are essential for the working of basic functionalities of the website. We also use third-party cookies that help us analyze and understand how you use this website. These cookies will be stored in your browser only with your consent. You also have the option to opt-out of these cookies. But opting out of some of these cookies may affect your browsing experience and may even preclude you being able to login to the website.
            Necessary
            Always Enabled
            Necessary cookies are absolutely essential for the website to function properly. These cookies ensure basic functionalities and security features of the website, anonymously.
            CookieDurationDescription
            __stripe_mid1 yearThis cookie is set by Stripe payment gateway. This cookie is used to enable payment on the website without storing any patment information on a server.
            __stripe_sid30 minutesThis cookie is set by Stripe payment gateway. This cookie is used to enable payment on the website without storing any patment information on a server.
            cookielawinfo-checkbox-advertisement1 yearSet by the GDPR Cookie Consent plugin, this cookie is used to record the user consent for the cookies in the "Advertisement" category .
            cookielawinfo-checkbox-analytics1 yearSet by the GDPR Cookie Consent plugin, this cookie is used to record the user consent for the cookies in the "Analytics" category .
            cookielawinfo-checkbox-necessary1 yearSet by the GDPR Cookie Consent plugin, this cookie is used to record the user consent for the cookies in the "Necessary" category .
            cookielawinfo-checkbox-others1 yearSet by the GDPR Cookie Consent plugin, this cookie is used to store the user consent for cookies in the category "Others".
            cookielawinfo-checkbox-performance1 yearSet by the GDPR Cookie Consent plugin, this cookie is used to store the user consent for cookies in the category "Performance".
            Functional
            Functional cookies help to perform certain functionalities like sharing the content of the website on social media platforms, collect feedbacks, and other third-party features.
            Performance
            Performance cookies are used to understand and analyze the key performance indexes of the website which helps in delivering a better user experience for the visitors.
            Analytics
            Analytical cookies are used to understand how visitors interact with the website. These cookies help provide information on metrics the number of visitors, bounce rate, traffic source, etc.
            CookieDurationDescription
            _ga2 yearsThe _ga cookie, installed by Google Analytics, calculates visitor, session and campaign data and also keeps track of site usage for the site's analytics report. The cookie stores information anonymously and assigns a randomly generated number to recognize unique visitors.
            _gid1 dayInstalled by Google Analytics, _gid cookie stores information on how visitors use a website, while also creating an analytics report of the website's performance. Some of the data that are collected include the number of visitors, their source, and the pages they visit anonymously.
            CONSENT2 yearsYouTube sets this cookie via embedded youtube-videos and registers anonymous statistical data.
            Advertisement
            Advertisement cookies are used to provide visitors with relevant ads and marketing campaigns. These cookies track visitors across websites and collect information to provide customized ads.
            CookieDurationDescription
            VISITOR_INFO1_LIVE5 months 27 daysA cookie set by YouTube to measure bandwidth that determines whether the user gets the new or old player interface.
            YSCsessionYSC cookie is set by Youtube and is used to track the views of embedded videos on Youtube pages.
            yt-remote-connected-devicesneverYouTube sets this cookie to store the video preferences of the user using embedded YouTube video.
            yt-remote-device-idneverYouTube sets this cookie to store the video preferences of the user using embedded YouTube video.
            Others
            Other uncategorized cookies are those that are being analyzed and have not been classified into a category as yet.
            CookieDurationDescription
            cookielawinfo-checkbox-functional1 yearThe cookie is set by GDPR cookie consent to record the user consent for the cookies in the category "Functional".
            SAVE & ACCEPT
            Powered by CookieYes Logo