• Skip to primary navigation
  • Skip to main content
  • Skip to footer
  • Store
  • Support
  • Theme Documentation
  • My Account
  • Cart

9seeds

Building Custom WordPress Solutions | Plugin Development

 
  • Custom Development
  • Themes
  • Plugins
  • About
  • Contact
  • Blog

Tech Talk

Creating a WordPress User when you don’t have an existing admin login to use

Posted on August 3, 2015

A long time ago we wrote a post on how to insert yourself into WordPress as an admin that has been very popular.

Just to be clear, this won’t help you hack a WordPress site. You have to have some kind of server level access to make use of any of these, but in our work we often have scenarios where we only have access to a server.

There are 3 quick ways to create a WordPress user from outside the WordPress dashboard.

Creating a WordPress user with WP CLI USER CREATE

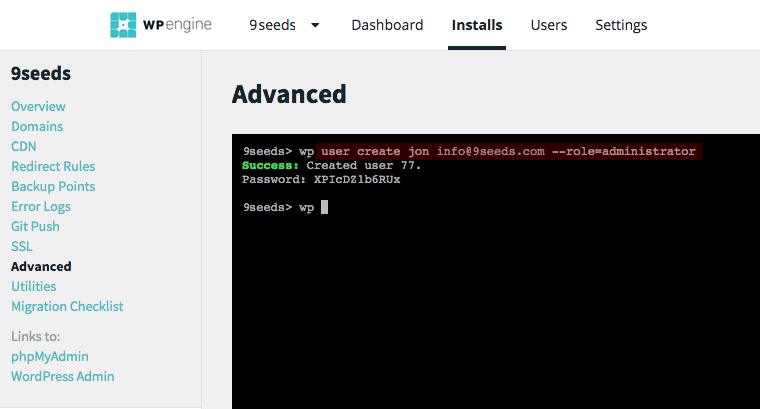
My new favorite way is using WP CLI.  This requires that WP CLI is installed on the server, but recently WP Engine started rolling out WP-CLI Support to Select Partners for Beta Testing.  

It’s not just a WP Engine thing though, a few other hosts provide WP CLI support via shell access and if you’re running on your own server you can install it.  You’re not likely to be able to install this yourself on shared hosting.

Assuming you do have access to WP CLI it’s as easy as SSH’ing into your server or using the WP Engine portal, and typing

wp user create name [email protected] --role=administrator

You can specify a password with –user_pass=”Password!” or if you don’t it’ll create a random and very secure password for you!

Create-User-WP-CLI

Create a WordPress user via MySQL

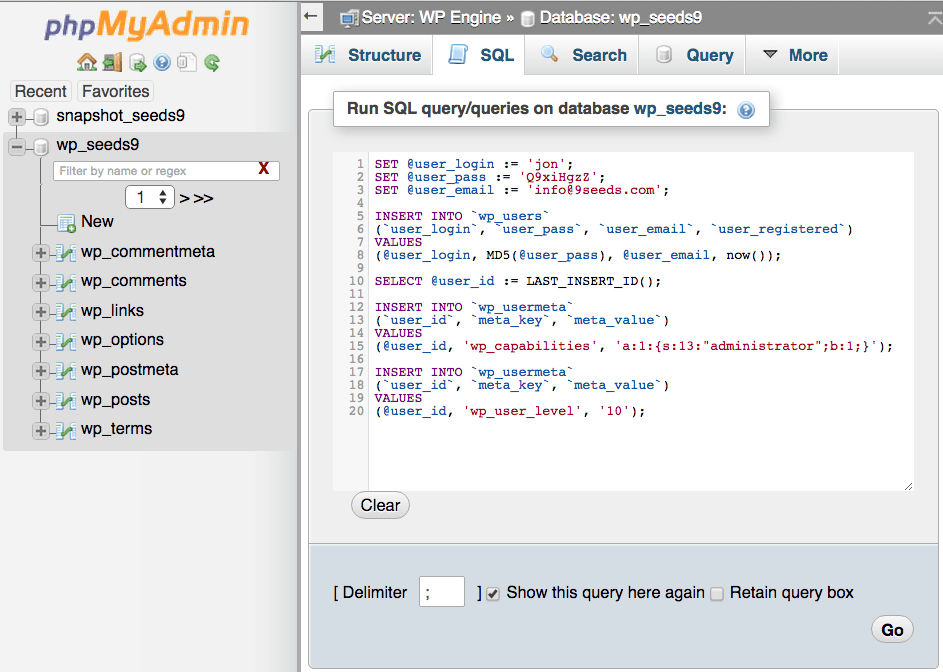
If you don’t have SSH access and WP CLI already installed the next quickest way is to insert a user via MySQL.

Here is the code snippet you can use, hopefully it’s obvious that you should replace the login, pass and email on the first 3 lines with your own. Otherwise, you’ll be giving us, and everyone that reads his post access to your site.

SET @user_login := '9seeds';
SET @user_pass  := 'muDAy2CUcTcuPnyCBXfqJysD';
SET @user_email := '[email protected]';

INSERT INTO `wp_users` 
(`user_login`, `user_pass`, `user_email`, `user_registered`) 
VALUES 
(@user_login, MD5(@user_pass), @user_email, now());
SELECT @user_id := LAST_INSERT_ID();
INSERT INTO `wp_usermeta` 
(`user_id`, `meta_key`, `meta_value`) 
VALUES 
(@user_id, 'wp_capabilities', 'a:1:{s:13:"administrator";b:1;}');
INSERT INTO `wp_usermeta` 
(`user_id`, `meta_key`, `meta_value`) 
VALUES 
(@user_id, 'wp_user_level', '10');

Most hosts include PHPMyAdmin so you can just jump into there, select the database you want to insert a user into, then go to the SQL tab and paste this code in. Don’t forget to edit the values on the first three lines before clicking the Go button to run the SQL query.

Create-User-MySQL

Create a WordPress user via FTP

This used to be my favorite way because often all the access I was given to a site was FTP access and I was less comfortable with MySQL then I am these days. Still it’s easy and reliable, especially if running running MySQL commands scares you.

You simply FTP to root directory of the site you need access to and create a new empty PHP file (or just “duplicate” an existing file and clear it out, that’s fine too).

Open up the file and insert the PHP code below. Again be sure you change the user, pass, and email values and save the edits to the file. Then, visit the file in web browser.  You should get a ‘Success!’ message.

Once you’ve run the file once you should delete the file just to be safe.

<?php
/**
 * Script to create administrator user in WordPress
 *
 * @package none
 * @link https://9seeds.com/creating-a-wordpress-user-when-you-dont-have-an-existing-admin-login-to-use/
 */

$s9_password = 'PASSWORD';
$s9_username = '9seeds';
$s9_email    = '[email protected]';

if ( 'PASSWORD' === $s9_password ) {
	die;
}

require_once 'wp-blog-header.php';

if ( ! username_exists( $s9_username ) && ! email_exists( $s9_email ) ) {

	$user_id = wp_create_user( $s9_username, $s9_password, $s9_email );

	if ( is_int( $user_id ) ) {
		$wp_user_object = new WP_User( $user_id );
		$wp_user_object->set_role( 'administrator' );
		echo 'Success!';
	} else {
		echo 'Error with wp_insert_user. No users were created.';
	}
} else {

	echo 'This user or email already exists. Nothing was done.';

}

That is it!  3 fairly easy ways to create a WordPress user when you don’t already have administrator level access to the WP dashboard.

Continue Reading

Jon Brown

    More by Jon Brown

    Deploying to SiteGround via git push

    Posted on October 20, 2014

    Git push is the best thing for deployments since sliced bread. I don’t know if sliced bread was ever a deployment requirement, but trust me it’s good. I used to work at a company that used a similar stack (svn+rsync) to deploy. I’m glad to see many hosting companies getting on board with git-push. May you never have to use FTP again!

    We have an account at SiteGround, which provides git push, but implemented in a different way than others like WPEngine. If you’re not careful with how you use it, it can lead to some strange results. I’d like to highlight some of the differences, so you don’t get yourself into trouble – especially if you don’t want core WP files to be under version control.

    Navigating SiteGround’s cPanel

    SiteGround uses the classic cPanel interface. To help you navigate, I’ve highlighted the areas of interest:

    cPanel home

    Creating a subdomain

    If you haven’t done so yet, you may want to create a subdomain for your install. We use a single domain at SiteGround and put several WP installs using subdomains for testing purposes. Here’s what the subdomain configuration looks like:

    cPanel subdomain

    If you’re setting up a WP install using your main domain name, you can skip creating a subdomain.

    Creating your WordPress instance at SiteGround

    When you go to add WordPress to your domain through cPanel, you’ll be using a tool called “Softaculous.” Click the big blue Install button to get started:

    cPanel new install

    Select the domain (or subdomain) that you want to turn into a WP install.

    Remember to change:

    • Database name – it will be auto-generated, I tend to choose something that matches the domain or subdomain so it’s easy to remember what it goes with.
    • Table Prefix – I use the normal wp_ – I think changing this has become “security through obscurity” and if you don’t keep your site up to date, this is unlikely to save you from an attack.
    • Admin Username – replace the auto-generated username with something useful, but avoid admin since it is easily targeted by attackers
    • Admin Email – replace the auto-generated one with a real email address for the site administrator.

    When the installation is done, to exit Softaculous and get back to the regular cPanel, just click the My Accounts tab at the top and then click the red Go to cPanel button.

    Creating the git repository at SiteGround

    Click the SG-Git icon on from cPanel. You’ll be brought to a screen where all of your WordPress installations are displayed, and if they don’t have git repositories associated with them, you’ll be given the option to create one. When you click Create Git Repository for your WP install, a dialog will come up with some git information. Record the git clone command, we’ll use it later.

    cPanel git info

    There will also be a SSH key and possibly the passphrase that goes along with it. Rather than using this key and sharing it with all the developers who you want to be able to push to this SiteGround account, I find it easier to add individual keys via cPanel.

    Setting up SSH keys and config

    SiteGround only takes DSA keys for SSH. If you don’t have an id_dsa.pub file in your ~/.ssh directory, you can create one by opening a terminal and running:

    ssh-keygen -t dsa

    Once your DSA key is generated, you can add it to the SiteGround control panel by clicking the SSH/Shell Access icon in cPanel. Copy the contents of your ~/.ssh/id_dsa.pub file and paste it into the text area on SiteGround:

    cPanel ssh key

    Some git clients won’t accept the fact that SiteGround uses a non-standard port for SSH. The way to get around this is to create a ~/.ssh/config file with an entry for SiteGround. If the git clone command SiteGround supplied looks like:

    git clone ssh://[email protected]:18765/home/sguser/public_html/git

    Then your ~/.ssh/config file should contain:

    Host mXX.siteground.biz
            HostName mXX.siteground.biz
            Port 18765
            User sguser
    

    Replace the Host, HostName, and User values with those from your account. I’ve changed them in this example for security purposes. To test you should be able to:

    ssh mXX.siteground.biz

    Notice you shouldn’t have to supply the username or the port, my ~/.ssh/config takes care of that. If you didn’t add a passphrase to your DSA key, you should be logged into SiteGround without having to supply a passphrase. Press Control-D to log out.

    Now your git endpoint can be simplified for your git client (username and port are removed):

    ssh://mXX.siteground.biz/home/sguser/public_html/git

    But don’t clone it just yet!

    How not to push, and what will happen

    The normal Git push workflow (for me) would be to init a git repository on my local system, add an origin of bitbucket.org or github.com and push it there, then add remotes (such as WPEngine production and staging) and proceed to push to those remotes. Instead I added SiteGround as a remote named sg-remote.

    Origin vs. Endpoint

    They key difference between SiteGround and WPEngine is that SiteGround treats their git repository as an origin (where you can pull and push), where WPEngine is a --bare endpoint that you can only push to.

    Since SiteGround is set up as an origin, if you just try to push there (without pulling or cloning from SiteGround first), you’ll likely get a warning like:

    Updates were rejected because the remote contains work that you do not have locally.

    Per git’s recommendation, you might then try to pull:

    git pull sg-staging master

    If your git repository was set up to not track WP core files, you’ll get a warning that:

    error: The following untracked working tree files would be overwritten by merge:
    index.php
    license.txt
    readme.html
    wp-activate.php
    wp-admin/about.php
    ...
    Aborting

    This is because the core WP files have been added to the SG-git repo, but not your local one. So then if your next move is:

    git push sg-staging master --force

    Several important files will be removed on your WP install at SiteGround: all of wp-admin, wp-config.php, and all other PHP files in the webroot folder. Needless to say, your WordPress instance will no longer function without some serious repair.

    Git push to SiteGround (modified functional workflow)

    Since SiteGround sets up the git repository as an origin, it is better to start your WP project with a git clone from SiteGround, but before doing that, I wanted to clean things up…

    If you don’t want core WP files under version control, the easiest solution is to remove them from version control directly at SiteGround before cloning the repo.

    Since we’ve already got SSH working, from your terminal you can:

    ssh mXX.siteground.biz
    cd /home/sguser/public_html/git
    git rm --cached -r wp-admin/ wp-includes/ *.php *.txt *.html
    git commit -a -m "Removed WP-Core files"
    

    Again, replace the host (ssh line) and path (cd line) with the values from your git clone command supplied by SiteGround. The ones used here are examples. The git rm --cached command removes the core WP files from revision control, but leaves them on the filesystem, so your installation doesn’t go into a state of disrepair (like above).

    Once that is done, you can clone!

    git clone ssh://mXX.siteground.biz/home/sguser/public_html/git

    SiteGround will be the origin, so let’s edit that (usually bitbucket.org or github.com is the true origin). This will rename it to sg-remote:

    git remote rename origin sg-remote

    Now when you want to push to SiteGround, just do:

    git push sg-remote master

    If you try to push a different branch to SiteGround, the branch will be transferred, but the code won’t be switched to that branch. To get around this you can overwrite SiteGround master by doing:

    git push sg-remote my-branch:master

    Hopefully this gives you some insight into how the SiteGround git deployments work, so you can use them effectively.

    If you’re interesting in learning more about git deployments or how to set up your own git-push-to-deploy, I recommend starting with this article to familiarize yourself with a basic setup:

    https://www.digitalocean.com/community/tutorials/how-to-set-up-automatic-deployment-with-git-with-a-vps

    Continue Reading

    justin

      More by justin

      Import/Export issues between MySQL 5.1 and 5.5+

      Posted on August 5, 2014

      There have been many advances in recent history that make a WordPress developer’s life easier. WordPress itself is already pretty easy as it’s very tolerant of a myriad of hosting environments. To make things easier for local setup, there’s a fantastic product called DesktopServer by ServerPress which will quickly and easily set up a multitude of local WordPress sandboxes to hack on. DesktopServer currently ships with MySQL 5.1 which is A-OK because WordPress requires version 5.0 or greater.

      When setting up a new development environment, we typically use WP Migrate DB Pro (HIGHLY RECOMMENDED!) to download the latest database data from staging or production into our local sandboxes. Other ways work just as well, like exporting from phpMyAdmin (or native mysqldump) and then using interconnect/it Search and Replace. WP Migrate DB Pro is just so easy because it does everything in one step.

      However, a problem reared its head recently while exporting from WPEngine (which currently uses MySQL 5.6) to DesktopServer.

      Continue Reading

      justin

        More by justin

        Hack to remove numbers from Jetpack sharing (sharedaddy) buttons

        Posted on July 22, 2014

        In June 2014, the whole 9seeds crew assembled at WordCamp Orange County 2014. While this has nothing to do with sharing buttons, I wanted to point it out since our remote work environments prevent us from getting together more than once a year. Thanks Orange County, the weather couldn’t have been nicer!

        At the conference, one compelling talk was about Social Media Strategies by Sarah Wefald. She has great real-world social media experience, working with bands – arguably the best use of social media. She’s also a punk-rock karaoke star.

        Continue Reading

        justin

          More by justin

          6 Other Uses for Gravity Forms

          Posted on April 7, 2014

          If you ask just about anybody who uses WordPress what their favorite plugin is for contact forms, they’re going to tell you it’s Gravity Forms. If you ask them why, they’ll tell you about how easy it is to set up a fairly complex form with radio buttons, dropdown lists, hidden fields and conditional logic. And they’re right. It easy to do those things. But, if you are only using Gravity Forms for contact forms, you’re only seeing the tip of the iceberg.

          Here are some other ways we’ve helped our clients while using Gravity Forms.

          1. Grow your mailing list
          add-to-mailinglist

          OK, this one is so simple, you’re going to kick yourself for not doing it a long time ago. Your site already has a contact form, right? Add a checkbox or radio button to the form that asks the question, “Can we add you to our mailing list?” If you use double opt-in for your mailing list, go ahead and default the answer to yes. Next, simply install the add-on plugin to connect your form to MailChimp, AWeber, Constant Contact, or whichever provider you use.

          2. Sell a product
          If you’re looking to build out a shopping cart with a bunch of products, this probably isn’t the answer. But If you have a single product that you’re looking to sell, Gravity Forms is up to the task. Grab the Paypal or Stripe add-on, add a product field to your form and you’ll be ready to start selling in minutes.

          3. Accept guest posts on your site

          guest-post
          Most times when sites tell you they’re looking for guest posters, they tell you to email your article to an editor. I feel sorry for the person who receives those entries. They’re having to do so much extra work. In Gravity Forms you simply need to use the Post Fields options. Add a Title and Body field to your form and then edit the title field’s settings. You’ll be able to mark the incoming posts as Drafts so they won’t be published until after you’ve approved them. If you want to get extra fancy you can also let the guest poster add an image that will be used as the Featured Image.

          You just made the process of accepting and processing guest posts drop-dead simple. Nice work!

          4. Add entries to a custom post type
          gf-event

          (This one is a little more advanced and is targeted more towards the developers in the room.)

          We’ve used this one for a number of clients. One that sticks out most was a client who said, “We’d like to let visitors submit upcoming events to display on our community calendar.” They already had a calendar plugin that used custom post types, so we only needed to create a form that had the proper fields, then use the Gravity Forms + Custom Post Types plugin to sync up the fields. The plugin lets you mark the incoming entries as drafts, making it easy for you to double-check the entries for bogus information before hitting publish. Bingo, you are now crowd sourcing your content!

          5. Connect. To. EVERYTHING.

          gf-to-zap

          This one could probably be a post all by itself. Have you ever heard of zapier.com? Zapier is a service that helps to connect services with other services based on actions being taken. For instance, you can use it to create an entry in Evernote each time somebody fills out a form on your site. Or post to Twitter, or ping you in HipChat, create a document in google Drive, post to Facebook, add files to Dropbox, create a record in Campfire, make a note in Basecamp or Asana… or one of another 100 or so things.

          The setup process for getting Zapier to work with Gravity Forms takes a little doing. I implore you to not assume anything and read the instructions as they’re given. Do one thing out of order and you’re starting over. Grab this add-on and get started.

          While it may be a little tricky to get set up, once you start automating, you’re going to want to automate even more.

          6. Build custom solutions
          gf-custom

          You’ve probably guessed that this one is on the advanced side, but I think it’s too important not to include.

          Event Central was a client who needed a shopping cart that wasn’t a shopping cart. They wanted to give clients the ability to shop like they were about to make a purchase, but instead of a checkout page, they end up at a Gravity Form. We collect a bunch of information about the event and then we use the Gravity Forms hooks & filters to pull in the products that the customer added to their shopping cart. All this information gets stored just like a standard Gravity Form and gets emailed to the appropriate person.

          This scenario is pretty specific, but that’s not important. What IS important is looking at Gravity Forms for all the things that it can do for you that might require a lot of extra work if you had to build it yourself. Data validation, storing the entries in an easy to use format, automated email responses, etc. All that is already built in to Gravity Forms, you simply need to tap in to it.

          Just the beginning

          Gravity Forms is one of the most powerful, most flexible WordPress plugins you’ll find. Our list of 6 uses still barely scratches the surface of everything you can do with it. If you have a custom use for Gravity Forms that you want to share, drop it in the comments. We’d love to hear about it!


          Continue Reading

          john

            More by john
            • Prev
            • Page 1
            • Page 2
            • Page 3
            • Page 4
            • Page 5
            • Next

            Footer

            Get in Touch

            • New Project Inquiry
            • Product Support and General Inquiry
            • Store Purchase Terms and Conditions
            • Store FAQ
            • Cookie Policy
            • Privacy Policy

            Our Services

            • Custom WP Development
            • Theme Store
            • Plugin Store

            WordPress Plugins for Sale

            • Time Tracker
            • Authorize.net SIM Gateway

            WordPress Plugins for Free

            • Simple Calendar
            • WP Chargify
            • Facebook
            • Twitter
            • LinkedIn
            • WordPress
            • GitHub

            Copyright 2025 | 9seeds, LLC

            Like nearly all websites this one uses cookies too. Like most users we think consent banners like these are a dumb solution, but it's what we've got until new laws are passed. We use cookies on our website for remembering your preferences, for example if you're logged in or what is in your cart. We also use 3rd party cookies for analytics so we know what pages on the site are most popular. By clicking “Accept”, you consent to the use of ALL the cookies.
            Do not sell my personal information.
            Cookie SettingsAccept
            Manage consent

            Privacy Overview

            This website uses cookies to improve your experience while you navigate through the website. Out of these, the cookies that are categorized as necessary are stored on your browser as they are essential for the working of basic functionalities of the website. We also use third-party cookies that help us analyze and understand how you use this website. These cookies will be stored in your browser only with your consent. You also have the option to opt-out of these cookies. But opting out of some of these cookies may affect your browsing experience and may even preclude you being able to login to the website.
            Necessary
            Always Enabled
            Necessary cookies are absolutely essential for the website to function properly. These cookies ensure basic functionalities and security features of the website, anonymously.
            CookieDurationDescription
            __stripe_mid1 yearThis cookie is set by Stripe payment gateway. This cookie is used to enable payment on the website without storing any patment information on a server.
            __stripe_sid30 minutesThis cookie is set by Stripe payment gateway. This cookie is used to enable payment on the website without storing any patment information on a server.
            cookielawinfo-checkbox-advertisement1 yearSet by the GDPR Cookie Consent plugin, this cookie is used to record the user consent for the cookies in the "Advertisement" category .
            cookielawinfo-checkbox-analytics1 yearSet by the GDPR Cookie Consent plugin, this cookie is used to record the user consent for the cookies in the "Analytics" category .
            cookielawinfo-checkbox-necessary1 yearSet by the GDPR Cookie Consent plugin, this cookie is used to record the user consent for the cookies in the "Necessary" category .
            cookielawinfo-checkbox-others1 yearSet by the GDPR Cookie Consent plugin, this cookie is used to store the user consent for cookies in the category "Others".
            cookielawinfo-checkbox-performance1 yearSet by the GDPR Cookie Consent plugin, this cookie is used to store the user consent for cookies in the category "Performance".
            Functional
            Functional cookies help to perform certain functionalities like sharing the content of the website on social media platforms, collect feedbacks, and other third-party features.
            Performance
            Performance cookies are used to understand and analyze the key performance indexes of the website which helps in delivering a better user experience for the visitors.
            Analytics
            Analytical cookies are used to understand how visitors interact with the website. These cookies help provide information on metrics the number of visitors, bounce rate, traffic source, etc.
            CookieDurationDescription
            _ga2 yearsThe _ga cookie, installed by Google Analytics, calculates visitor, session and campaign data and also keeps track of site usage for the site's analytics report. The cookie stores information anonymously and assigns a randomly generated number to recognize unique visitors.
            _gid1 dayInstalled by Google Analytics, _gid cookie stores information on how visitors use a website, while also creating an analytics report of the website's performance. Some of the data that are collected include the number of visitors, their source, and the pages they visit anonymously.
            CONSENT2 yearsYouTube sets this cookie via embedded youtube-videos and registers anonymous statistical data.
            Advertisement
            Advertisement cookies are used to provide visitors with relevant ads and marketing campaigns. These cookies track visitors across websites and collect information to provide customized ads.
            CookieDurationDescription
            VISITOR_INFO1_LIVE5 months 27 daysA cookie set by YouTube to measure bandwidth that determines whether the user gets the new or old player interface.
            YSCsessionYSC cookie is set by Youtube and is used to track the views of embedded videos on Youtube pages.
            yt-remote-connected-devicesneverYouTube sets this cookie to store the video preferences of the user using embedded YouTube video.
            yt-remote-device-idneverYouTube sets this cookie to store the video preferences of the user using embedded YouTube video.
            Others
            Other uncategorized cookies are those that are being analyzed and have not been classified into a category as yet.
            CookieDurationDescription
            cookielawinfo-checkbox-functional1 yearThe cookie is set by GDPR cookie consent to record the user consent for the cookies in the category "Functional".
            SAVE & ACCEPT
            Powered by CookieYes Logo