• Skip to primary navigation
  • Skip to main content
  • Skip to footer
  • Store
  • Support
  • Theme Documentation
  • My Account
  • Cart

9seeds

Building Custom WordPress Solutions | Plugin Development

 
  • Custom Development
  • Themes
  • Plugins
  • About
  • Contact
  • Blog

Todd Huish

Quickly Convert Your Restaurant Into Curbside Delivery With Online Ordering

Posted on May 21, 2020

All across the country restaurants have been shuttered while we figure out what COVID-19 means to our normal way of life. However, just because you’ve closed the dining room doesn’t mean you have to close your doors completely. Most jurisdictions are allowing for curbside delivery and carry-out options. The question now is: how do you go about making that happen?

There are plenty of services out there to help you with this problem if you are setting up for home delivery: UberEats, DoorDash, GrubHub, Postmates; the list grows every day. While these services have some good benefits, they come with some drawbacks as well.

What Does it Cost?

While most of these services are free to the restaurant, they cost your customers. The fees are all over the map, depending on which one they choose, and it’s impossible to keep track. Sometimes your customers just need, and love, the convenience; but sometimes they just want to pick up some food without tacking on all these extra fees.

Who’s Customers are These?

Another problem is that, by using these services you are giving away one of your primary assets to these third parties: your customer data.
These are your customers, not GrubHub’s. When you want to contact your customers, you should be able to without talking to some other entity to do so. If you’re having a slow day or need to do a salad special before all the arugula goes bad, you should be able to reach out to your customer list with a quick promotion. “Half off the Arugula Steak salad while supplies last!”

Make Your Website Work for You

It is time to make your website do some heavy lifting for you. It can do more than just display an image of your menu and list your hours. Instead, you’re going to put your menu online in an easily editable format with beautiful pictures. If you run a special, it takes just a few minutes to edit your online menu and have it be just as available to your customers online as it would be if they had walked in and seen that fresh sheet right there in the restaurant. You’re also going to be able to take orders directly from the site, no human intervention required. Customers can place an online order, including payment and including tip, all up front. Finally, you’re going to be able to contact your customers as a group just as easily as sending an email.

This is a lot of heavy duty functionality, but thanks to the power of WordPress and its ease of use, you will be able to do this all yourself. From here on out I am assuming that you are already using WordPress, and I will be talking about how to achieve these goals with it and the plugins you can install on a WordPress site. This isn’t the only way to solve the problem of taking online orders for your restaurant; but in my experience, it’s just the easiest and most robust solution.

Install WooCommerce

I have written about WooCommerce before and everything I have said before still stands. There is simply not a more flexible, robust way to have your customers put multiple items into a cart and pay for them online. If you are using WooCommerce for a restaurant, there are only a couple things I would call out specifically.

WooCommerce is going to refer to everything as a “product;” but in terms of your restaurant, you can replace that word with dish.

Every product has a “category;” but for your restaurant the category is going to be the course or menu section. You will put in a dish and assign it a category, like Specials, Appetizers, Soups & Salads, Entrees, Desserts, or Beverages. However you organize your food on the menu, you are going to want to organize it the same way on the site. In addition, you can assign multiple categories to a single product. So if you have different menus for lunch and dinner, you can assign the dish both “entree” and “dinner” and it will easily group with all the rest of the dinner entrees. You would add the Beverages category to all options you serve.

Last, each product is going to have something called “product tags”. For a restaurant, I would suggest using these tags to make it easier for your customers to search for items. Good examples of product tags are beef, poultry, vegan, and gluten-free. Tags are for short descriptive words, not long sentences.

Now that you know what all those terms mean, you’re ready to set up your menu. For each dish you have in the restaurant you would create a new product, assign it a category (or more if necessary), give it some tags, upload a photo, and assign it a price.

Repeat until all your dishes are created.

Get Paid

Now you need to set up your payment processor. You can set up as many as you want, but in general the fewer options your give your customers, the better. Give them a way to pay with a credit card and, if you want, you could allow them to pay when they come and pick the food up. WooCommerce refers to that second option as an “offline payment method” and by default it will say “Pay by Check”. If you are going to offer this option you are going to want to change that option to “Pay at Pick-up” or something else that sounds good to you.

For the credit card orders, there are any number of options to choose from. There’s even a possibility that WooCommerce can hook into what you are already using for payments. If you don’t want to try and hook into your payment system, then you can’t go wrong with Stripe. It’s very easy to set up, it has reasonable fees, and it just works. I have used every imaginable payment processor out there and the “it just works” feature is worth more than you might imagine.

Tipping

The one thing that is a little different when it comes to online orders vs. the regular restaurant experience, is that in non-restaurant related business there is rarely an opportunity to add a gratuity. You could just leave this entire step out if you wanted to simplify the process, but there is a very affordable plugin that will help you keep the option to add gratuity to an order.

WooCommerce Donation Or Tip On Cart And Checkout is a very affordable plugin that will seamlessly allow a tip to be added while your customers are checking out and paying for their dinner orders.

Getting the Orders

Email
Finally, after the customer has placed their order and paid for it, you need to be notified that the order has been placed. With no additional work, you can keep track of email order notifications with a phone or tablet monitored by a manager or front of house person. To make sure you’re seeing those email notifications, you’ll want to set up you email box so that emails from the ordering system come in as a VIP email.

Texting
A slightly better way to handle notifications is to have the email go directly to a phone with texting capabilities using your mobile providers email to SMS gateway address. Each mobile company has an email address you can send an email to that will take a standard email and send it directly to your phone. T-Mobile’s, for example, is tmomail.net; so if you were using T-Mobile on the phone you receive orders on, you would set the orders emails in WooCommerce to go to [email protected]. Just replace xxxxxxxxxx with your phone number and any email that goes to that address will get texted right to your orders phone.

Many more methods…
I could double the length of this post just talking about getting orders out of the system and into the hands of your chefs. For example, using Zapier and a Gmail account, you could have emails automatically routed to a cloud based printer. Another excellent choice, using Zapier, is to have it call your restaurant phone line with a simple message like “Order is in the system”. There are as many different ways to solve this as there are different types of restaurants, so once you get to the point in which you want an improved notification experience, you may want to contact a developer to help you out.

Continue Reading

Todd Huish

    More by Todd Huish

    Moving from Brick and Mortar Sales to Online Orders

    Posted on March 27, 2020

    If you’re one of the thousands of non-essential retail stores closed right now, you may be looking for what it is going to take to move your sales online. It’s probably an idea you’ve been kicking around for a while but the complexity of how to make it all work has stopped you from going down that path. Regardless of what happened before, this is the time to make the jump to online sales.

    Choosing an ecommerce platform

    The first thing to solve when moving to functioning as an online retailer is to decide which shopping cart system to use. The number of choices you can make at this point is daunting. I am not going to get into a large pros and cons of the various service in this article. I am simply going to start with some assumptions and give you a good recommendation as a starting point.

    You want to…

    1. Get up and running as fast as possible.
    2. Sell items from your store on your store’s website.
    3. Maintain a path for maximum flexibility as you grow your online business.

    With those criteria established there’s only one real choice that meets them all, and that is WooCommerce. WooCommerce works for every business whim imaginable. Go to the extensiogns page of their site and you can see over 350 different ways to extend WooCommerce to fit your particular need. There are shipping services, mailers, payment integrations, and customer service extensions. In addition to all those external integrations there are all the extensions that change how WooCommerce actually works. You can turn a WooCommerce install into something to handle bookings, sell subscription services, safely sell downloadable products, and automatically calculate US state taxes or VAT. If you can imagine it, WooCommerce with its library of extensions can probably make it happen.

    Over 4 million sites run WooCommerce. This number is important to you because with that many people running the software, they’re always working on adding new features that their customers want. In addition, it means that they are always working to keep that installed base secure with patches and updates to keep your store safe. Finally, that enormous installed base of WooCommerce sites means that when you want to do something fancy there are a lot of WooCommerce developers around to support your ideas.

    Another major benefit is that WooCommerce is very simple to get configured and ready for sales. If you can upload a picture of a product and give it a price, you can run a WooCommerce based store.

    Finally, WooCommerce has a great pricing model. It’s free! Some of the extensions and more advanced features have costs associated with them but if you are just getting a store up and running it’s nice to know you won’t have to have a huge outlay in capital for licensing and software just to get started.

    Getting started with WooCommerce

    Install WooCommerce
    It is easier to see than to describe so take a look at the simple WooCommerce setup video below to see what it takes to get up and running very quickly.

    Now What?
    Once your store is up and running you can now take a step back and look at your next steps. It’s possible you could just stop here. If your store looks the way you want it to and you don’t mind some paperwork to handle shipping and inventory management, you could just stop here. Make sure your Google listing has your store website listed and you’re set.

    If, however, you want to automate inventory management, make shipping easier or make your store look a little fancier, here are some additional steps to consider.

    Install a WooCommerce Compatible Theme
    While WooCommerce makes every effort to be compatible with any theme you are using on your site, the sheer amount of themes out there makes this a very complicated task. The way they make the base plugin the most compatible is by making it display products as simply as possible. If you want your site to stand out a little you will probably want to install a WooCommerce specific theme.

    Installing a WooCommerce theme means that you can have a lot of basic look and feel changes right in your admin area and you won’t have to write code or talk to a developer to get your site to look more like the way you want it to.

    My recommendation is that you cannot go wrong by choosing a Storefront based theme. Storefront is the official WooCommerce theme and has the maximum amount of compatibility with WooCommerce. They have almost 20 different variations on this theme and one of them would almost certainly get you where you want to go with a minimum of fuss. Another good choice (if I do say so myself) is the Jessica theme. Jessica is a Genesis based theme that looks great right out of the box with very little configuration. Finally, you also may want something a little more custom in which case it might be time to talk to a developer and see about something built to your exact specifications.

    Calculating Shipping costs with WooCommerce

    Install a Shipping Plugin
    Once you start doing any level of shipping whatsoever you are going to want assistance in getting your products out the door and into the hands of your customers. Fulfilling orders by hand and printing labels will make the most stable among us tear their hair out in frustration very quickly. Getting ShipStation is an affordable way to remove these headaches from the get-go.

    The ShipStation plugin has an added benefit of being able to automatically calculate shipping prices, in real-time, as your customers are checking out.
    In addition to handling your shipping needs, ShipStation also helps with inventory management as an impressive bonus. With ShipStation hooked up to WooCommerce it gives you a single interface to manage your inventory while handling shipping. No more hassle of trying to match orders to labels. It’s all in one place.

    Other honorable mentions in this category are Shippo and ShipBob. Both of these also have very tight WooCommerce integrations. They may have extended features or pricing that might work better for your business.

    Hooking up a POS system to WooCommerce

    The final item isn’t for everyone but to close the loop on inventory and sales and is to install a Point of Sale (POS) system that integrates with WooCommerce. Once your store is open for business again you are not strictly online you are going to want to make sure all the sales data is going into one place. Once again, WooCommerce comes to the rescue with its incredible versatility. This section is going to be a little different than what I have mentioned before because the system you use is going to be very dependent on what POS you are already using. If you are starting from scratch you could do a lot worse than simply starting with Square. Square has long been a favorite for non-traditional POS systems. You can even use your own phones and tablets in a pinch and on the go. As an added bonus the WooCommerce integration is through a free plugin.

    Another service like Square is Lightspeed. This is a full featured service with integrated hardware and software, much like Square. Unlike Square, the plugin to integrate with WooCommerce costs $150/yr so keep that in mind. If you already have Lightspeed, however, installing that plugin and WooCommerce is a very quick way to get your online sales hooked up.

    Lightspeed and Square can deter some people because of their inherent ongoing costs for both the service and the hardware. The major benefit of either is that your headaches are much reduced by getting an integrated system. The screens, credit card swipe, receipt printing, and cash drawers are all hooked up and connected and you don’t have to worry about any of it. The downside to all this convenience is cost. A full kit for Square starts at $600 and you have to add a tablet on top of that. Lightspeed doesn’t publish their hardware prices which makes me suspicious that they are probably more expensive than that.

    If you’re looking to get up and running by simply using hardware you already have, FooSales might be what you’re looking for. The plugin is $15/mo and there’s no sales people to talk to, no hardware to install right off the bat. You can simply sign up and be selling, in person, directly out of your WooCommerce inventory in minutes. You will have more set-up to do in terms of printing receipts and hooking up card readers but if you like that sort of control, take a look at their hardware page and see how you can connect it all yourself. This can be a nice solution for a lot of businesses because sometimes getting something workable, quickly, today, is more important than getting it perfect, later. This also gives you the ability to add the pieces and parts as you go without having to do the entire outlay all at once.

    What’s next with WooCommerce

    I’ve tried to give a very straightforward rundown of how WooCommerce can help you get your business online with as few headaches as possible. I’ve also tried to cover some more advanced topics that you will almost certainly want to implement if you want to keep the management of your online and physical store inventory and sales in sync, get your site looking just the way you want it to, and to keep your shipping headaches minimized.

    WooCommerce can do it all and puts that power into your hands.

    I hope you’ve found this post helpful in clearing up some of the mystery about how to get WooCommerce up and running. As always, if you have any questions about this or anything else we’ve written about, please feel free to contact us.

    Continue Reading

    Todd Huish

      More by Todd Huish

      Case Study: Gamifying PeepSo for a Growing Member Community

      Posted on March 13, 2019

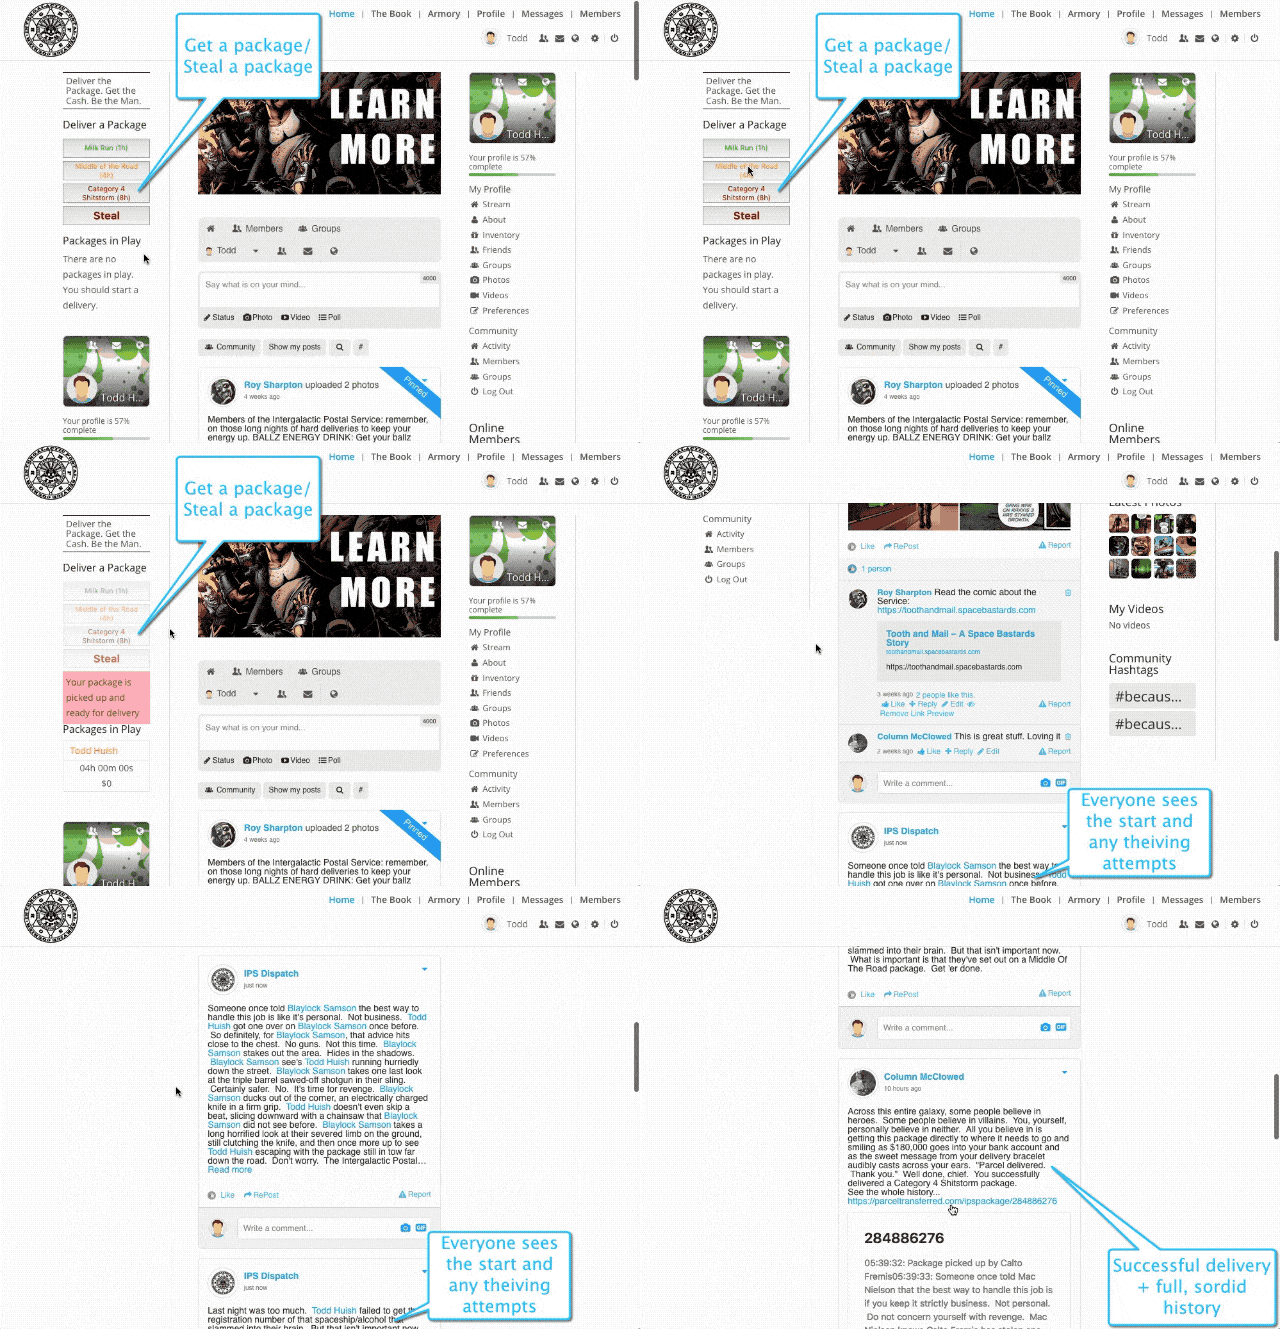
      While requests for community websites and gamification are fairly common, building a fully integrated custom game within communities is much less so — and we love an interesting project. That’s why, when Intergalactic Postal Service approached 9seeds to create a game within their online community sidebar on a tight timeline, we excitedly responded, “game on”.

      IPS is building a cool themed community, and wanted to debut the new social-integrated game at an upcoming comic book convention to their loyal members. Since the delivery deadline was two weeks away, we needed to find the most efficient combination of technology to accomplish the task.

      Luckily, IPS was using PeepSo, an easily extensible member community plugin for WordPress that we often recommend. While it has a smaller user base than BuddyPress, it’s a more tightly integrated package and more full featured out of the box. This was going to be the first time we added gamification to PeepSo though.

      The game build

      The build for this social-enabled game was fairly straightforward from a standalone standpoint, the interesting part was integrating it seamlessly into the PeepSo community.

      General requirements

      • The game is turn-based.
      • Activities must happen asynchronously.
      • The game must work within the PeepSo sidebar as a widget.
      • Players are notified about activities within the game via the PeepSo notification system.

      Gameplay

      • A player initiates an action and other players are able to interact with the player based on that action.
      • A master dispatcher announces each interaction to the PeepSo activity stream.
      • Non-player characters occasionally interact with real players when site activity is down.
      • Master dispatch user is able to actively interact with the live chat plugin to let a player know directly when something happened to them (as well as who was responsible) to allow for swift counter-action.

      Building the integration

      PeepSo has a slick, JavaScript-heavy user interface. In order to seamlessly integrate with the technology and UX of the site, the game would also need to load and run using the same JavaScript framework and interactivity. That meant adding custom JavaScript using standard WordPress methods; and Ajax calls to the backend for the widget.

      Within the PeepSo profile area, there’s a PeepSo-specific widget area that only PeepSo widgets work within, and it deviates a bit from how widgets normally work within WordPress. PeepSo support was great at providing code examples to help implement the widget, and in turn the game into a PeepSo widget.

      Once the widget shell was added, game was coded, and notifications integration was planned out, it was time to start hooking into the site’s social features.

      Hooking into PeepSo

      To get the system messages into the community timeline, we used a helper function to interact with PeepSo:

      public static function peepso( $owner, $user, $msg ) {
       $activity = PeepSoActivity::get_instance();
       $result = $activity->add_post( $owner, $user, $msg );
      }

      Next we built the private chat between Game Master and user:

      $model = new PeepSoMessagesModel();
      $msg_id = $model->create_new_conversation($gm, $msg, '', array($pm,$userid));

      The final step before client testing was to add a public audit log (or leaderboard with stats) to encourage deeper engagement. We made quick work of adding a new tab in the PeepSo user profile area along with companion visibility and permissions options in the PeepSo administration console.

      Game On

      And just like that, it was time to test the game mechanics, display, UX, and messaging hooks.

      What we had originally thought might be an extremely involved project was made easier by some excellent integration framework and support from the PeepSo team.

      Have an interesting PeepSo integration project you’d love to get started on? Get in touch and let us know how we can help!

      Continue Reading

      Todd Huish

        More by Todd Huish
        Adjusting Code Increases MemberPress Value

        Using MemberPress to Get that Magazine Feeling

        Posted on November 6, 2017

        Our customers come up with the best ways to use software sometimes. I recently had to have my eyes opened to the fact that just because we are in a digital age doesn’t mean we have to abandon all the old tools available to us.

        Let’s say you want to do a magazine style site where monthly content is given to subscribers. A standard way of implementing this with membership software is to charge for a monthly subscription which gives you access to everything, Then if you cancel, you lose access to the site. In one respect this model gives people the incentive to remain a customer but in another sense, it’s not exactly fair.

        • If a customer paid for a subscription and received 3 “issues” why wouldn’t they retain access to that over time?
        • Another thing to think about is that if you are expecting your customers to pay monthly, you have to keep the prices low enough such that they don’t notice it on the bill. This is how Time gets away with it at just $2.50/mo. That’s low enough to just pay forever without worrying about it and having access to (quick google search) 93 years worth of back-issues.
        • If you want to charge a higher subscription rate you have to offer a little more and one of those things can be the fact that they get to retain access to issues they were subscribed.

        So… how to implement this? Without code there really isn’t a way to accomplish this. The reality is it completely breaks the concept of a membership site to allow people access to premium content after they are no longer a member.

        MemberPress developers to the rescue.

        MemberPress recently implemented a rule which allows for this exact scenario. At its simplest form it states, “Even though you have access to this resource, I’m going to deny you anyway.” The way we correct this is to simply not protect the magazine issues and instead write a little snippet of code which asks, “This issue was published on March 9th, does the user attempting to access this issue have a transaction for March 9th?”

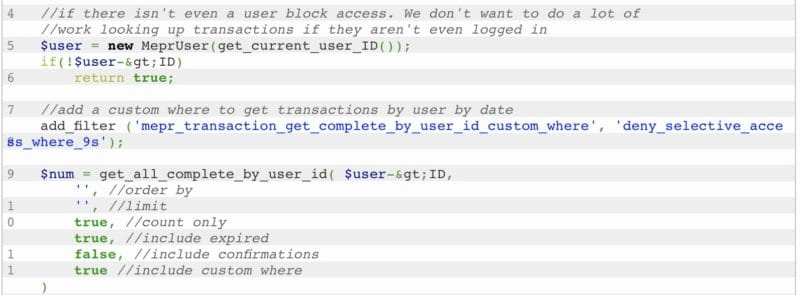
        With the chunk of code below we check and make sure they have a transaction covering the time period they’re trying to access. If they do, we allow them to see what they’ve already purchased.

        We love taking awesome products like MemberPress and tweaking them to provide the exact functionality our clients desire. If you have a WordPress or MemberPress customization project, please get in touch:

        Get in Touch with 9seeds

        add_filter('mepr-last-chance-to-block-content', 'deny_selective_access_9s');
        function deny_selective_access_9s($deny,$current_post,$uri) {
            //short circuit if it's not even a magazine issue post type
            if($current_post->post_type != 'magazine-issue')
                return $deny;
        
            //if there isn't even a user block access. We don't want to do a lot of 
            //work looking up transactions if they aren't even logged in
            $user = new MeprUser(get_current_user_ID());
            if(!$user->ID)
                return true;
        
            //add a custom where to get transactions by user by date
            add_filter('mepr_transaction_get_complete_by_user_id_custom_where', 'deny_selective_access_where_9s');
            
            $num = get_all_complete_by_user_id( $user->ID,
                '', //order by
                '', //limit 
                true, //count only
                true, //include expired
                false, //include confirmations
                true //include custom where
            )
            
            //do not leave this filter lying around to confuse other parts of the memberpress software
            remove_filter('mepr_transaction_get_complete_by_user_id_custom_where', 'deny_selective_access_where_9s');
        
            if(!$num)
                $deny = true;
        
            return $deny;
        }
        function deny_selective_access_where_9s($where,$user_id){
            global $post,$wpdb;
              $where .= $wpdb->prepare(
                'AND %s > t.created_at  AND %s < t.expires_at ', $post->post_date,
                $post->post_date
              );
            return $where
        }
        
        Continue Reading

        Todd Huish

          More by Todd Huish

          Using Memberpress to Convert Free Users to Paid

          Posted on January 10, 2017

          MemberPress is a great WordPress membership plugin that lets you create rules to protect your content and sell subscriptions to access that content. Making customized exceptions to those rules though has long been a bit challenging even for WordPress developers.
          Thanks to filters added in the latest version of MemberPress however it’s now much easier to customize MemberPress rules! We did that for a client recently.

          Having a Successful Membership Site

          A client came to us with an existing site that had a lot of content generated over time and building a sizable list of registered users. They wanted to augment their free subscription model with selling memberships to access some of that same content.

          MemberPress was built for this kind of scenario!  They installed the plugin and had already set up the following tags and MemberPress rules:

          1. Made a whole library of premium posts
          2. Tagged posts appropriately: Beginner, Intermediate, and Advanced
          3. Created 3 paid membership levels in MemberPress (Beginner for $5/mo, Intermediate for $7/mo, and Advanced for $10/mo)
          4. Set up 3 MemberPress rules to:
            • Protect all content tagged Beginner and allow Advanced, Intermediate, and Beginner memberships to access it
            • Protect all content tagged Intermediate and allow Advanced, and Intermediate memberships to access it
            • Protect all content tagged Advanced and allow Advanced memberships to access it

          With the exception of creating the content, it’s a very straightforward setup, each membership level can access all the content for their subscription level and below.

          Converting Existing Users to Paid Users

          It’s easy to direct traffic to your sales page and to get first-time site visitors to signup for something free, but what about getting all the existing free registered users to sign up for a paid membership?

          It’s also becoming common practice to build semi-permeable content gateways where a visitor can access a little content for free with or without registering but then getting locked out from viewing more content until they subscribe.

          There’s no way in MemberPress at the moment to allow limited access to some things if they don’t have a MemberPress membership of some sort though. MemberPress recently added a new hook in their WordPress plugin, however that helps with this exact scenario.

          What this hook allows is for a site owner to do is send an email to all their currently registered users and say “Hey, we have all this new premium content, you should buy it but as a long time registered user we’re going to give you unrestricted access to a premium lesson so you can try it out”.

          By setting this up in code and allowing an existing user to get access it works out better because there’s no friction to the customer. You lose a certain percentage of people for every click you make them do to get a thing so by handling it this way it just appears to work magically as far as the customer is concerned. Another way to solve this would be to make a new membership and only allow existing members to sign up for it.

          We discussed this with the client but they wanted to offer their existing base access to any single lesson they wanted. By creating a membership and then putting in a rule it would either overly give these users access to the entire library or you would have to pick a single lesson to showcase as the “free” premium one.

          Custom Code for MemberPress

          All of the non-code ideas were a compromise and so we went with the original plan and put in the following snippet for them.

          add_filter('mepr-pre-run-rule-content', 'allow_premium_access_9s' ,10,3);
          function allow_premium_access_9s( $protect, $current_post, $uri ) {
              $user = new MeprUser(get_current_user_ID());
              $prd = get_page_by_title('Premium Membership', OBJECT, MeprProduct::$cpt);
              //make sure we have a user and the premium membership lookup succeeded
              if($prd->ID && $user->ID) {
                  //if the user isn't already a premium member
                  if(!$user->is_already_subscribed_to($prd->ID)) {
                      $promo_access = get_user_meta($user->ID,'promo_access',true);
                      if(!$promo_access) {
                          //if the user does not already have promo access to a lesson
                          //allow them in to this one
                          update_user_meta($user->ID,'promo_access',array('lesson'=>$current_post->ID,'expiration'=>strtotime("+1 month")));
                          $protect = false;
                      } elseif($promo_access['lesson'] == $current_post->ID && $promo_access['expiration'] > time()) {
                          //The user has previously chosen this to be their promo lesson and
                          //their special access is not expired
                          $protect = false;
                      }
                  }
              }
              return $protect;
          }
          

          The thing about this rule is that it allows for some sneaky special things anytime you are running a promotion. Another good example is allowing access to a protected post if there’s a special code on the URL. Put that URL code right into your Facebook ad’s target URL and have someone get to see premium content for 1 click. Then when they go off the page you let the unauthorized message do its job and upsell them to membership status.

          With the new MemberPress customizations, you can now selectively grant access to protected parts of your site without making complicated interlocking sets of rules for promotional items which sometimes live and die within days.

          Continue Reading

          Todd Huish

            More by Todd Huish
            • Page 1
            • Page 2
            • Next

            Footer

            Get in Touch

            • New Project Inquiry
            • Product Support and General Inquiry
            • Store Purchase Terms and Conditions
            • Store FAQ
            • Cookie Policy
            • Privacy Policy

            Our Services

            • Custom WP Development
            • Theme Store
            • Plugin Store

            WordPress Plugins for Sale

            • Time Tracker
            • Authorize.net SIM Gateway

            WordPress Plugins for Free

            • Simple Calendar
            • WP Chargify
            • Facebook
            • Twitter
            • LinkedIn
            • WordPress
            • GitHub

            Copyright 2025 | 9seeds, LLC

            Like nearly all websites this one uses cookies too. Like most users we think consent banners like these are a dumb solution, but it's what we've got until new laws are passed. We use cookies on our website for remembering your preferences, for example if you're logged in or what is in your cart. We also use 3rd party cookies for analytics so we know what pages on the site are most popular. By clicking “Accept”, you consent to the use of ALL the cookies.
            Do not sell my personal information.
            Cookie SettingsAccept
            Manage consent

            Privacy Overview

            This website uses cookies to improve your experience while you navigate through the website. Out of these, the cookies that are categorized as necessary are stored on your browser as they are essential for the working of basic functionalities of the website. We also use third-party cookies that help us analyze and understand how you use this website. These cookies will be stored in your browser only with your consent. You also have the option to opt-out of these cookies. But opting out of some of these cookies may affect your browsing experience and may even preclude you being able to login to the website.
            Necessary
            Always Enabled
            Necessary cookies are absolutely essential for the website to function properly. These cookies ensure basic functionalities and security features of the website, anonymously.
            CookieDurationDescription
            __stripe_mid1 yearThis cookie is set by Stripe payment gateway. This cookie is used to enable payment on the website without storing any patment information on a server.
            __stripe_sid30 minutesThis cookie is set by Stripe payment gateway. This cookie is used to enable payment on the website without storing any patment information on a server.
            cookielawinfo-checkbox-advertisement1 yearSet by the GDPR Cookie Consent plugin, this cookie is used to record the user consent for the cookies in the "Advertisement" category .
            cookielawinfo-checkbox-analytics1 yearSet by the GDPR Cookie Consent plugin, this cookie is used to record the user consent for the cookies in the "Analytics" category .
            cookielawinfo-checkbox-necessary1 yearSet by the GDPR Cookie Consent plugin, this cookie is used to record the user consent for the cookies in the "Necessary" category .
            cookielawinfo-checkbox-others1 yearSet by the GDPR Cookie Consent plugin, this cookie is used to store the user consent for cookies in the category "Others".
            cookielawinfo-checkbox-performance1 yearSet by the GDPR Cookie Consent plugin, this cookie is used to store the user consent for cookies in the category "Performance".
            Functional
            Functional cookies help to perform certain functionalities like sharing the content of the website on social media platforms, collect feedbacks, and other third-party features.
            Performance
            Performance cookies are used to understand and analyze the key performance indexes of the website which helps in delivering a better user experience for the visitors.
            Analytics
            Analytical cookies are used to understand how visitors interact with the website. These cookies help provide information on metrics the number of visitors, bounce rate, traffic source, etc.
            CookieDurationDescription
            _ga2 yearsThe _ga cookie, installed by Google Analytics, calculates visitor, session and campaign data and also keeps track of site usage for the site's analytics report. The cookie stores information anonymously and assigns a randomly generated number to recognize unique visitors.
            _gid1 dayInstalled by Google Analytics, _gid cookie stores information on how visitors use a website, while also creating an analytics report of the website's performance. Some of the data that are collected include the number of visitors, their source, and the pages they visit anonymously.
            CONSENT2 yearsYouTube sets this cookie via embedded youtube-videos and registers anonymous statistical data.
            Advertisement
            Advertisement cookies are used to provide visitors with relevant ads and marketing campaigns. These cookies track visitors across websites and collect information to provide customized ads.
            CookieDurationDescription
            VISITOR_INFO1_LIVE5 months 27 daysA cookie set by YouTube to measure bandwidth that determines whether the user gets the new or old player interface.
            YSCsessionYSC cookie is set by Youtube and is used to track the views of embedded videos on Youtube pages.
            yt-remote-connected-devicesneverYouTube sets this cookie to store the video preferences of the user using embedded YouTube video.
            yt-remote-device-idneverYouTube sets this cookie to store the video preferences of the user using embedded YouTube video.
            Others
            Other uncategorized cookies are those that are being analyzed and have not been classified into a category as yet.
            CookieDurationDescription
            cookielawinfo-checkbox-functional1 yearThe cookie is set by GDPR cookie consent to record the user consent for the cookies in the category "Functional".
            SAVE & ACCEPT
            Powered by CookieYes Logo